Add a belt to two pulleys
On this page you put an HTD5M belt between two pulleys. Builder works out the length the belt needs and tells you whether a belt from the shop fits.
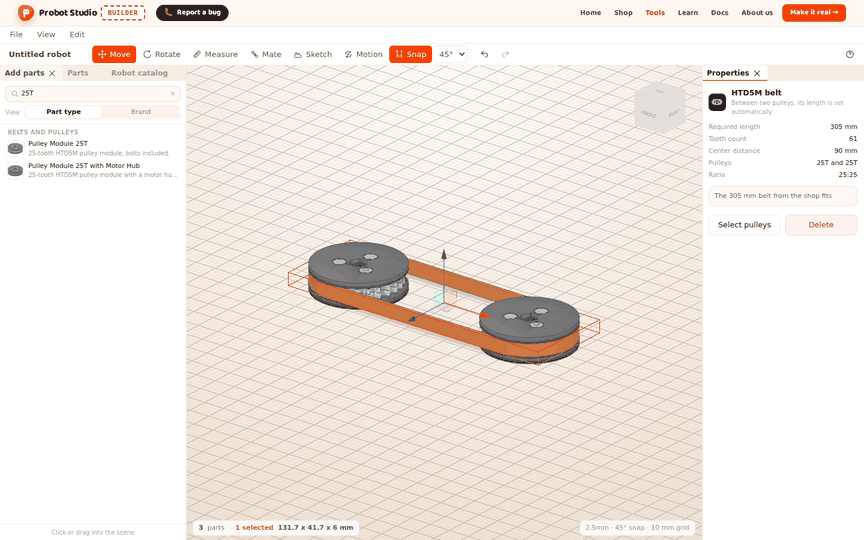
Before you start
- The scene is empty (File > New), or your robot has two pulleys.
- The pulleys are in Add parts > Belts and Pulleys, in the Pulley Module family row: 25T, 32T and 25T with Motor Hub. The shop's 245, 305 and 340 mm HTD5M belts are in the HTD5M Belt family row of the same section. In a search, the rows show their full name (for example Pulley Module 25T).
- For a belt, the axes of the two pulleys must be parallel, and the pulleys must be in the same plane (at most 1.5 mm off). The pulleys must not be too close to each other.
Place two pulleys to practice
- In the Left panel, select the Add parts tab.
- In the Search parts... box, type
25Tand select the Pulley Module 25T row. The pulley appears in the scene and is selected. - In the Properties panel, under Position (mm), type
0in the X box and0in the Z box. Press Enter after each one. - Select the Pulley Module 25T row again. A second pulley appears.
- Under Position (mm), type
90in the X box and0in the Z box, then press Enter.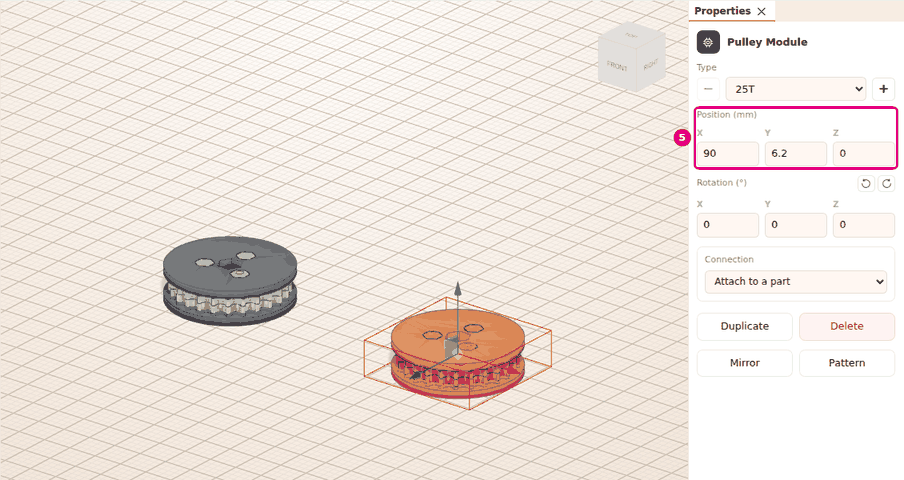
Result: The two pulleys are at the same height, with their centers 90 mm apart.
Select two pulleys and add a belt
Tip
Place the pulleys in the same plane, with parallel axes, and far enough apart to leave room for a belt. That way, Add belt is not faded. See Troubleshooting.
- In the Scene, select the first pulley.
- Hold Shift and click the second pulley. The Properties panel shows "Multiple selection 2 parts" and, below it, "Required length 305 mm. The 305 mm belt from the shop fits".
- In the Properties panel, press Add belt (K). It appears when exactly two pulleys
are selected.
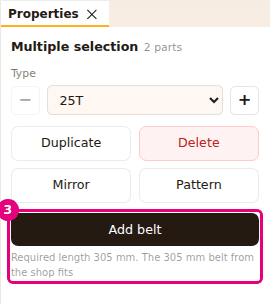
Result: A "Belt added, 305 mm" notification appears. A belt wraps around the two pulleys and is selected.
There are three more ways to do the same thing:
- Select Edit > Add belt.
- In the Scene, right-click one of the selected pulleys and select Add belt in the context menu.
- Press K.
If a belt cannot be added, Add belt in Properties is faded and the reason is written below it. In the context menu, the reason shows in the item's tooltip.
If both pulleys have a joint, the belt can also set up a pulley pair. This happens only when nothing drives the driven pulley's joint yet. The ratio is added to the end of the notification, for example "25:25 pulley pair set up" (see Set up joints and try the motion).
Read the belt's measurements
- In the Left panel, select the Parts tab.
- In the Search in parts... box, type
belt. - In the list, select the HTD5M belt row.
- In the Properties panel, press Select pulleys. The two pulleys the belt wraps around are
selected.
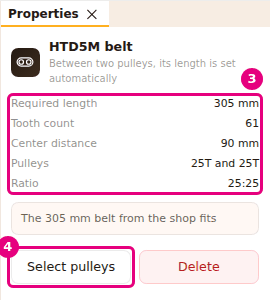
Result: While the belt is selected, the heading shows "HTD5M belt" and "Between two pulleys, its length is set automatically". After Select pulleys, the two pulleys are selected.
| Row | What | In this example |
|---|---|---|
| Required length | The length of the belt that wraps around the pulleys | 305 mm |
| Tooth count | The number of teeth of a belt this long (tooth pitch 5 mm) | 61 |
| Center distance | The distance between the centers of the two pulleys | 90 mm |
| Pulleys | The tooth count of each pulley | 25T and 25T |
| Ratio | The ratio of the tooth counts | 25:25 |
The box below the rows tells you about the shop belt. If a belt fits, it says "The 305 mm belt from the shop fits". If not, it gives the closest belt, how much too short or too long it is, and how many mm to move the pulleys closer together or farther apart. Then the note "Listed separately in the Make it real list" also appears.
What happens when the pulleys move
When you move one of the pulleys, the belt follows it, and its length and center distance are worked
out again. For example, if you set the X value of the second pulley to 100, the box says "The
closest belt in the shop is 340 mm, 15 mm too long. Move the pulleys 7.5 mm apart".
If the pulleys no longer fit the belt (an axis turned or the plane shifted), the belt stays where it last fit. When you select the belt, a yellow box gives the reason. If you raise the Y value of the second pulley by 5 mm, you see this: "The pulleys no longer fit the belt. The pulleys are not in the same plane, 5 mm off. The belt stays where it last fit". Line the pulley up again, or select Edit > Undo. When the pulleys fit again, the warning goes away.
Delete the belt
- In the Parts tab, type
beltin the Search in parts... box. - In the list, select the HTD5M belt row.
- In the Properties panel, press Delete.
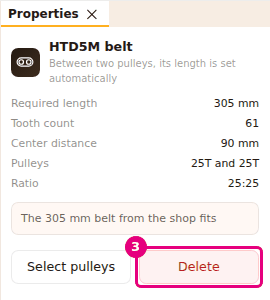
Result: The belt goes away and the pulleys stay where they are. To bring it back, select Edit > Undo (Ctrl+Z).
If you delete one of the pulleys, the belt is deleted with it. A belt is not copied on its own. A belt is copied, duplicated or mirrored only together with its two pulleys.
Having trouble?
- Add belt is faded in the Edit menu: The selection is not exactly two pulleys. Select only the two pulleys. See Troubleshooting.
- The message "Select two pulleys for a belt" appears: The selection has more or fewer than two parts. See Troubleshooting.
- It says "Both parts must be pulleys": One of the parts you selected is not a pulley. See Troubleshooting.
- It says "The pulley axes are not parallel": One pulley is tilted. Make its Rotation (°) values the same as the other pulley's. See Troubleshooting.
- It says "The pulleys are not in the same plane, N mm off": The pulleys are more than 1.5 mm apart along the axis. Slide the pulley along the axis. See Troubleshooting.
- It says "The pulleys are too close": Move the pulleys farther apart. See Troubleshooting.
- It says "These pulleys already have a belt": The same two pulleys cannot take a second belt. See Troubleshooting.
- It says "The closest belt in the shop is ...": The shop has no belt of the required length. Move the pulleys closer together or farther apart by the number of mm in the message.
Next step
- Move the pulley that the belt turns: Set up joints and try the motion
- Add the belt to the cart: Make it real: send the parts list to the shop cart