Interface tour
This page shows every region and every button on the Blocks screen. The region names used in the task pages are defined here.
Blocks is a single page. The Probot Blocks and FTC Blocks tabs in the toolbar pick the mode. The toolbar buttons, the block list and the side panel change with the mode you pick.
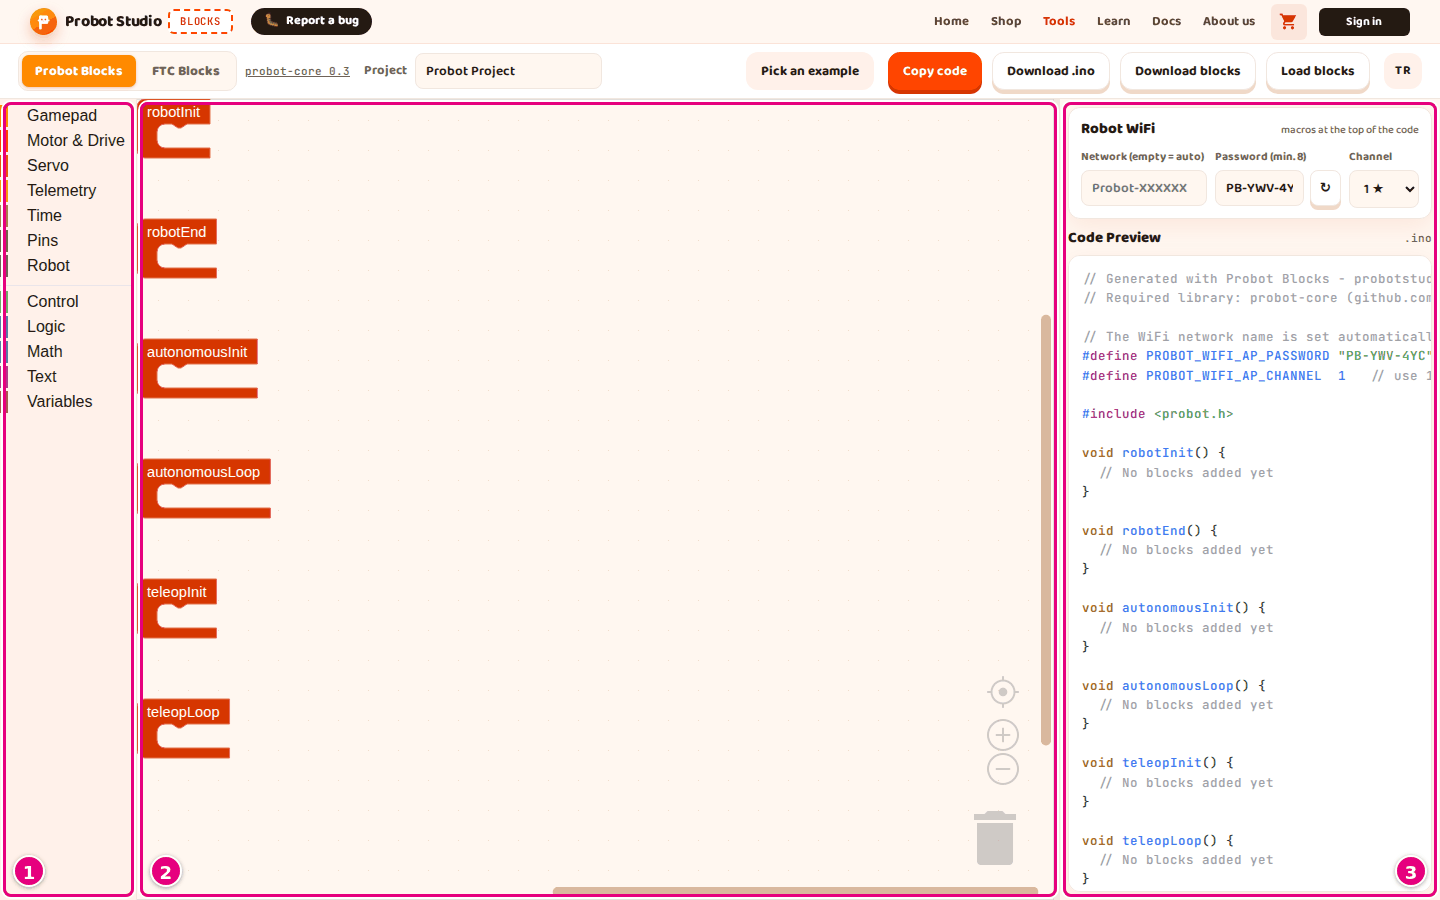
Regions in both modes
These regions are the same in both modes.
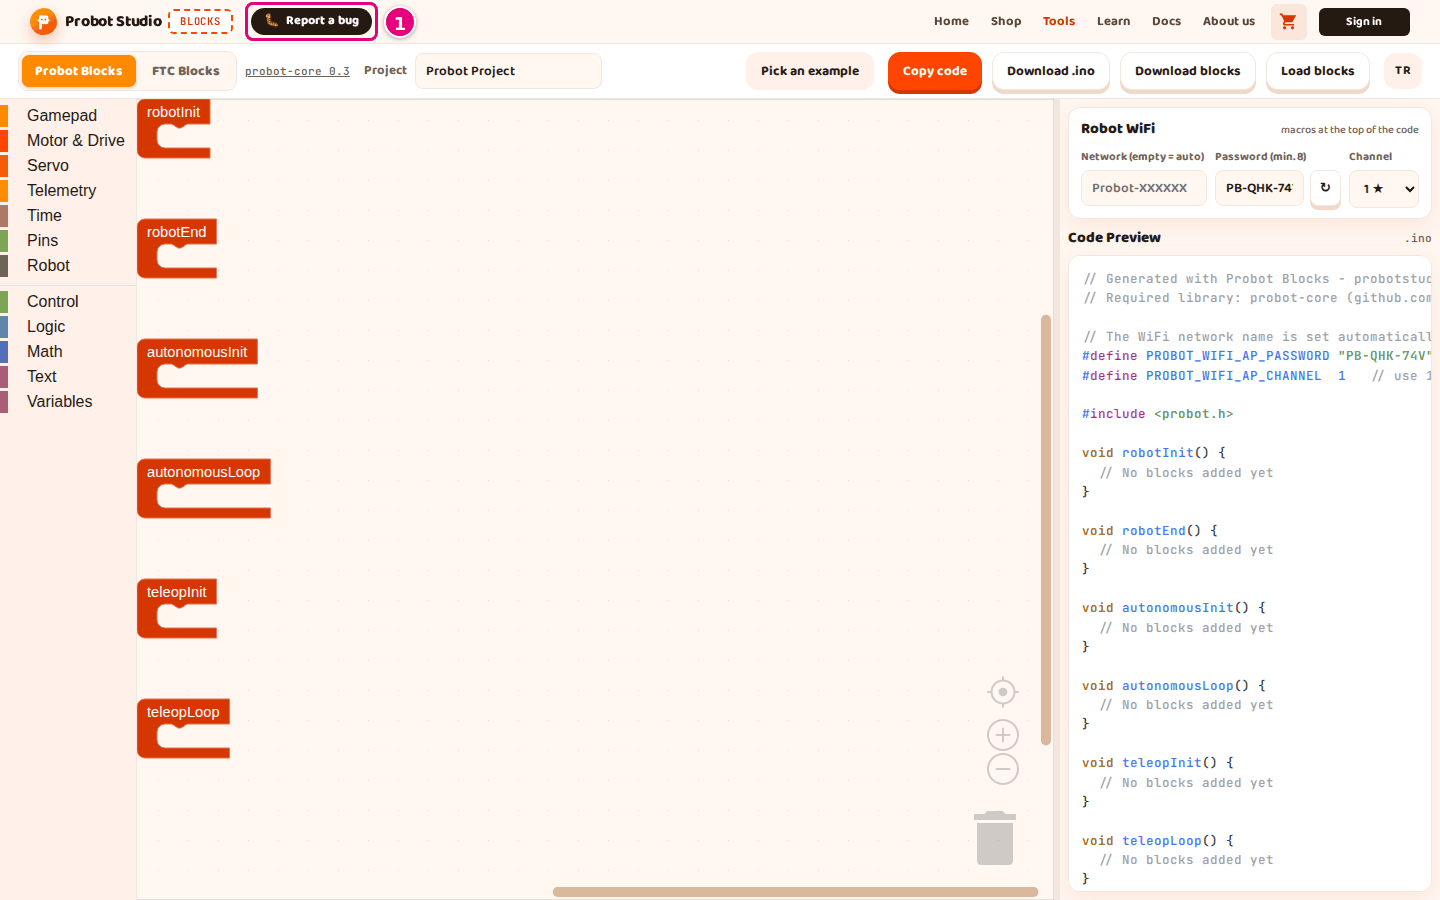
| # | Name | What it does | Shortcut | Related task |
|---|---|---|---|---|
| Site header | The Probot Studio logo, the "BLOCKS" badge, Report a bug and the site menu (Home, Shop, Tools, Learn, Docs, About us). The cart icon and Sign in belong to the whole site. Blocks works without signing in. | |||
| Toolbar | The mode tabs, the project or OpMode name and the file buttons. The buttons change with the mode (see below). | |||
| 1 | Report a bug | Opens a form where you can tell the team about a bug or send an idea. It always stays in the site header, next to the "BLOCKS" badge. On a screen narrower than 560 pixels the badge is hidden and the button shows only the 🐛 icon. | Report a bug | |
| Notification | Shows the result of an action: orange on success, red on error. It disappears after 5 seconds. | |||
| Intro card | The "Coding tool is in development" card that appears every time the page opens. Got it, continue closes the card. Report a bug opens the form. While the card is open, Report a bug in the site header is shown with a ring and an arrow that says "The Report a bug button is always here". | Esc closes it | First 10 minutes | |
| Cookie banner | Appears on your first visit. Accept allows detailed analytics. Only necessary limits it to counting visits without cookies. |
Mode tabs
| Name | What it does | Shortcut | Related task |
|---|---|---|---|
| Probot Blocks | Switches to the Probot kit mode. | Start with a ready-made example | |
| FTC Blocks | Switches to FTC mode. The first time you select it, the FTC editor loads. After that, switching between modes does not lose the program. | Start with an FTC example |
The tabs sit at the left end of the toolbar. Next to them is the text probot-core 0.3 (Probot) or "Control Hub" (FTC).
If you have never picked a tab, the tool opens on the FTC Blocks tab. The browser remembers the last tab you selected.
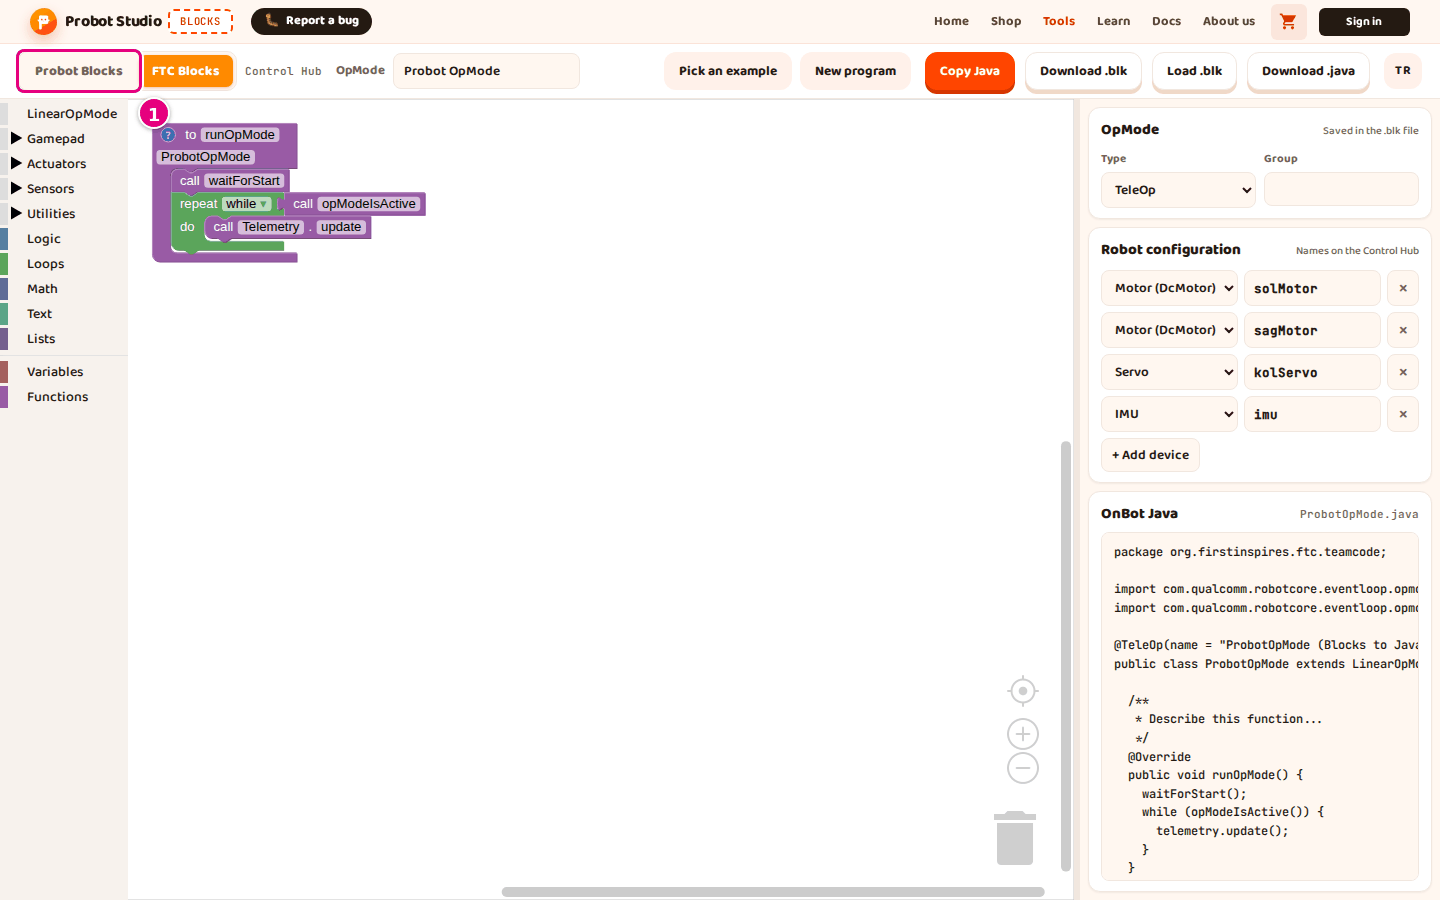
Probot Blocks screen
Toolbar (Probot)
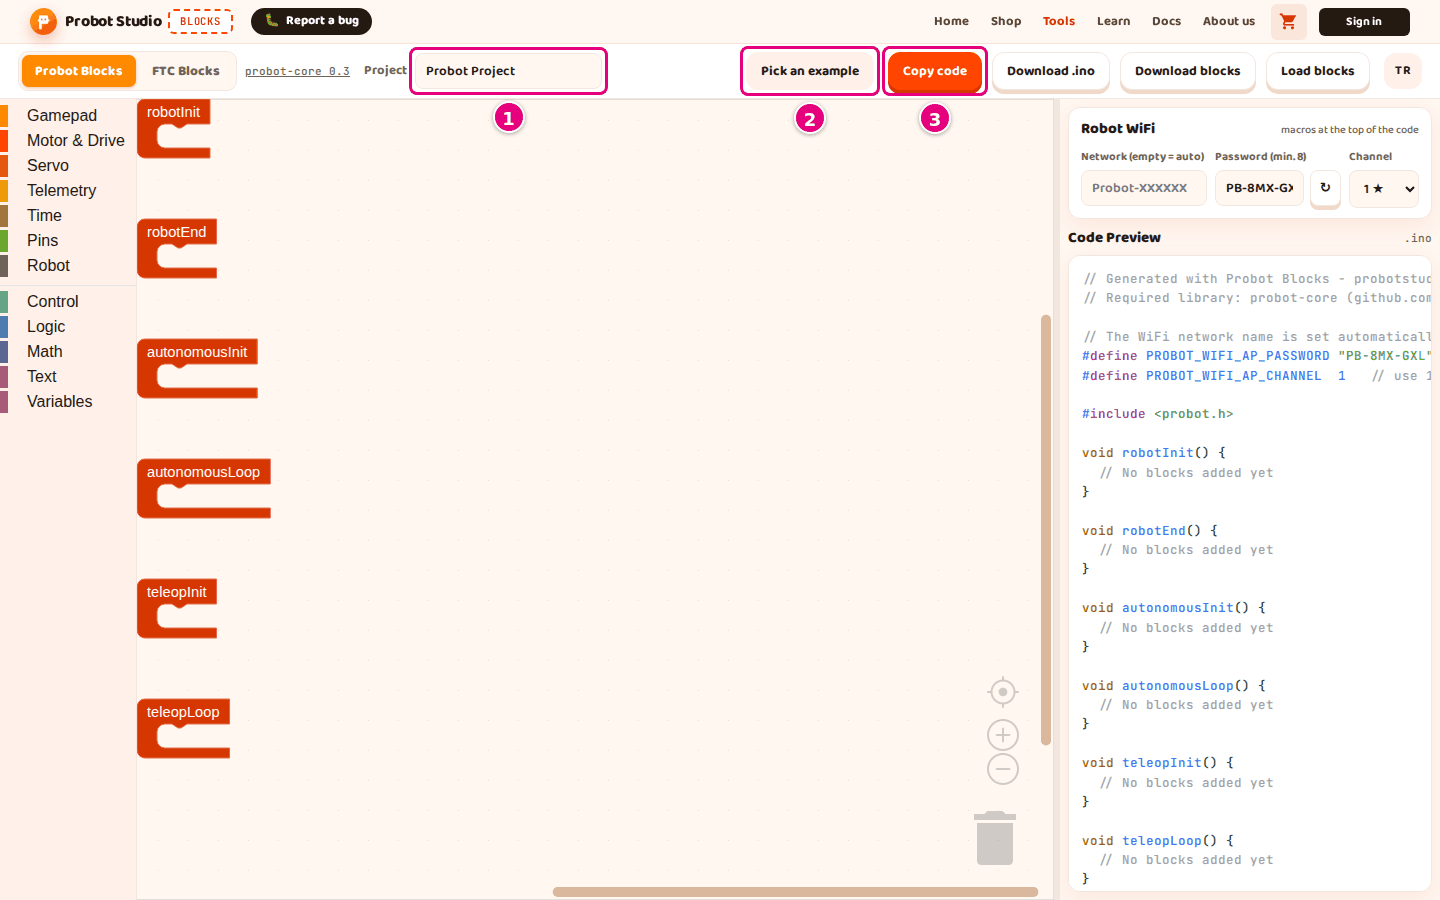
| Name | What it does | Shortcut | Related task |
|---|---|---|---|
| probot-core 0.3 | Shows which library version the code is made for. Press it to open the Probot Core documentation. That documentation covers a newer version, so Blocks does not generate functions it mentions, such as autonomousStop(). |
Upload the code to the Probot board | |
| Project | The project name, 60 characters at most. The downloaded files are named after it. When it is empty, it shows "Probot Project". | Save the project, open it and start over | |
| Pick an example | Opens the "Probot examples" window. When an example is loaded, the button reads "Example: <name>". | Start with a ready-made example | |
| Copy code | Copies the code in Code Preview to the clipboard. | Copy or download the code | |
| Download .ino | Downloads the code as a <project-name>.ino file. |
Copy or download the code | |
| Download blocks | Downloads the project as a <project-name>.probot.json file: the blocks, the project name and the WiFi settings. |
Save the project, open it and start over | |
| Load blocks | Opens a .probot.json file. It replaces the project in the workspace without asking first. |
Save the project, open it and start over |
Block list (Probot)
Press a category to open its block panel. Then drag a block from the panel into the workspace. What each block does is on the Probot block reference page.
| Category | What is inside |
|---|---|
| Gamepad | Blocks for reading the gamepad, its sticks, its buttons and its D-Pad. |
| Motor & Drive | Defining, driving and stopping motors. Tank drive and arcade drive. |
| Servo | Defining a servo, setting its angle, turning its signal off. |
| Telemetry | Writing text and values to the Driver Station screen. |
| Time | Elapsed time and waiting. |
| Pins | Reading and writing the board's pins. Serial output. |
| Robot | Battery voltage, phase and robot status. |
| Control | If, repeat and loop blocks. |
| Logic | Comparisons, and/or, true/false. |
| Math | Numbers and math operations. |
| Text | Text and joining text. |
| Variables | Create variable... and the blocks of the variables you create. |
Workspace (Probot)
| Name | What it does | Shortcut | Related task |
|---|---|---|---|
| Lifecycle blocks | Six fixed blocks: robotInit, robotEnd, autonomousInit, autonomousLoop, teleopInit, teleopLoop. They cannot be deleted. Only blocks connected inside them go into the code. | Write a drive program | |
| Grid | The dotted background. Blocks snap to the dots. | ||
| Center button (target icon) | Centers the view and resets the zoom. | Add, connect and edit blocks | |
| + | Zooms in (up to 2x). | Ctrl+wheel | Add, connect and edit blocks |
| − | Zooms out (down to 0.3x). | Ctrl+wheel | Add, connect and edit blocks |
| Trash can | Deletes a block you drop on it. Press it to list the deleted blocks in a panel. You can drag them back from there. | Add, connect and edit blocks |
Menu that opens when you right-click an empty area:
| Item | What it does | Shortcut |
|---|---|---|
| Undo | Undoes the last action. | Ctrl+Z |
| Redo | Does the undone action again. | Ctrl+Y |
| Clean up Blocks | Lines the blocks up neatly, one under another. It does not delete anything. | |
| Delete <n> Blocks | Deletes every block except the lifecycle blocks. If there are two or more blocks to delete, it asks first. |
Menu that opens when you right-click a block:
| Item | What it does | Shortcut |
|---|---|---|
| Duplicate | Makes a copy of the block and puts the copy next to it. | Ctrl+C, Ctrl+V |
| Inline Inputs / External Inputs | Shows the block's inputs side by side or stacked. | |
| Disable Block / Enable Block | Takes the block out of the code for now, or puts it back (not on lifecycle blocks). A disabled block looks faded. | |
| Delete Block / Delete <n> Blocks | Deletes the block and the blocks inside it. | Delete |
| Help | Opens the block's help page. Only Control, Logic, Math, Text and Variables blocks have it. | |
| Create 'set <name>' / Create 'get <name>' | Only on variable blocks: puts the set ... to ... block or the read block of the same variable next to it. |
The menu of a lifecycle block has only Inline Inputs and Disable Block. Disabling a lifecycle block does not change the code: the blocks inside it look faded but still go into the code. To keep a lifecycle block's contents out of the code, disable the blocks inside it one by one.
Menu that opens when you press a variable's dropdown (for example solMotor ▾):
| Item | What it does |
|---|---|
| Variable names | Picks the variable the block uses. |
| Rename variable... | Changes the variable's name everywhere. |
| Delete the '<name>' variable | Deletes the variable and the blocks that use it. If other blocks also use the variable, it first asks "Delete <n> uses of the '<name>' variable?" (<n> = the total number of blocks). If only this block uses the variable, it deletes it without asking. |
Side panel (Probot)
| Name | What it does | Shortcut | Related task |
|---|---|---|---|
| Panel handle | The thin strip between the workspace and the side panel. Drag it to widen or narrow the side panel. It works only with a mouse. | Add, connect and edit blocks | |
| Robot WiFi section | The settings of the WiFi network the robot will broadcast. The values are written at the top of the code. | Set up the robot WiFi | |
| Network (empty = auto) | The network name, 24 characters at most. When it is empty, the robot uses its own name in the Probot-XXXXXX format. |
Set up the robot WiFi | |
| Password (min. 8) | The network password, 8-24 characters. It accepts only capital letters, digits and -. Lowercase letters are turned into capitals. If it is empty, the code uses the password Probot1234. |
Set up the robot WiFi | |
| ↻ (Generate a new password) | Makes a new password in the PB-XXX-XXX format. |
Set up the robot WiFi | |
| Channel | The WiFi channel, 1-13. The channels with a star (1, 5, 9, 13) are recommended. | Set up the robot WiFi | |
| Code Preview section | The .ino code generated from the blocks. It updates right away after every change. You cannot type in it. |
Copy or download the code |
Probot examples window
| Name | What it does | Shortcut | Related task |
|---|---|---|---|
| Search examples... | Searches the example names and descriptions. When the window opens, the cursor is here. | Start with a ready-made example | |
| Example card | Loads the example and closes the window. The card of the loaded example is highlighted. | Start with a ready-made example | |
| × | Closes the window. Clicking outside the window closes it too. | Esc |
FTC Blocks screen
The FTC editor itself is always in English. Its categories, blocks and right-click menus come from FTC's own editor. The side panel and the toolbar belong to Blocks.
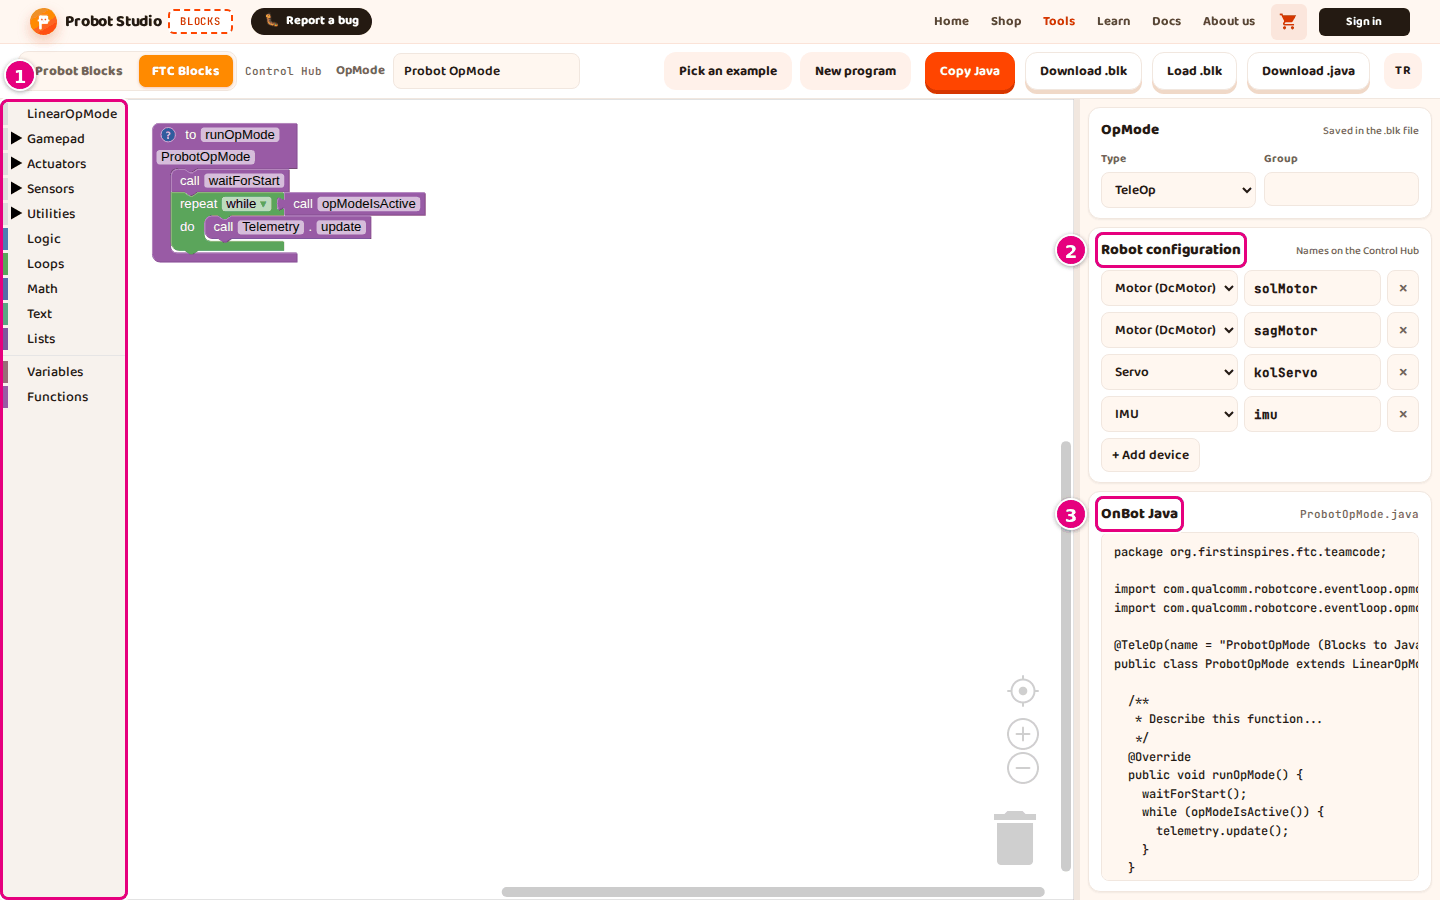
Toolbar (FTC)
| Name | What it does | Shortcut | Related task |
|---|---|---|---|
| "Control Hub" text | Shows that this mode is for the REV Control Hub. Pressing it does nothing. | ||
| OpMode | The OpMode name, 60 characters at most. The Java class name and the file names come from it. | Write a new FTC program | |
| Pick an example | Opens the "FTC examples" window. | Start with an FTC example | |
| New program | Asks first, then puts the program back to how it started. The Robot configuration and the OpMode name do not change. | Write a new FTC program | |
| Copy Java | Copies the code in the OnBot Java section to the clipboard. | Save the program, open it and get the Java code | |
| Download .blk | Downloads the program as a <ClassName>.blk file. |
Save the program, open it and get the Java code | |
| Load .blk | Opens a .blk file. It replaces the program without asking first. |
Save the program, open it and get the Java code | |
| Download .java | Downloads the Java code as a <ClassName>.java file. |
Save the program, open it and get the Java code |
Block list (FTC)
The categories are in English. Categories marked with an arrow have subcategories. The list of blocks is on the FTC block reference page.
| Category | What is inside |
|---|---|
| LinearOpMode | OpMode commands such as waitForStart, opModeIsActive and sleep. |
| Gamepad | Gamepad sticks and buttons. Subcategories: Pressed, Rumble. |
| Actuators | Motors and servos. Subcategories: DcMotor, Servo, CRServo, with your device names under them. |
| Sensors | Sensors. Subcategory: IMU. |
| Utilities | ElapsedTime, Range, Telemetry, Time. |
| Logic, Loops, Math, Text, Lists | General programming blocks. |
| Variables | Create variable... and the variable blocks. |
| Functions | Blocks that define and call functions. |
The device categories are built from the Robot configuration. If the configuration has no device of a type, its category does not appear.
Workspace (FTC)
| Name | What it does | Shortcut | Related task |
|---|---|---|---|
| to runOpMode block | The main block of the program. It cannot be deleted. Blocks go inside it. | Write a new FTC program | |
| Center button | Centers the view. | ||
| + / − | Zooms in (up to 3x) / zooms out (down to 0.3x). | Wheel | |
| Trash can | Deletes a block you drop on it. Press it to list the deleted blocks in a panel. You can drag them back from there. |
Menu that opens when you right-click an empty area: Undo, Redo, Clean up Blocks (lines the blocks up), Collapse Blocks (folds all blocks), Expand Blocks (unfolds all blocks), Delete <n> Blocks (deletes every block that can be deleted).
Menu that opens when you right-click a block:
| Item | What it does |
|---|---|
| Duplicate | Makes a copy of the block. |
| Add Comment / Remove Comment | Adds a note to the block or removes the note. |
| Inline Inputs / External Inputs | Shows the inputs side by side or stacked. |
| Collapse Block / Expand Block | Folds the block into one line or unfolds it. |
| Disable Block / Enable Block | Takes the block out of the program for now, or puts it back. |
| Delete Block | Deletes the block. The to runOpMode block does not have it. |
| Help | Opens the block's help page. It is faded on some blocks. |
| Create "<name>" | On a function block: makes the block that calls that function. |
Menu that opens when you press a variable's dropdown:
| Item | What it does |
|---|---|
| Variable names | Picks the variable the block uses. |
| Rename variable... | Changes the variable's name everywhere. |
| Delete the "<name>" variable | Deletes the variable and the blocks that use it. If other blocks also use the variable, it first asks "Delete <n> uses of the "<name>" variable?". |
Side panel (FTC)
| Name | What it does | Shortcut | Related task |
|---|---|---|---|
| Panel handle | Widens or narrows the side panel. It works with a mouse and by touch. | ||
| OpMode section | The OpMode settings that are saved in the .blk file. |
Write a new FTC program | |
| Type | TeleOp or Autonomous. | Write a new FTC program | |
| Group | The group name on the Driver Station, 40 characters at most. You can leave it empty. | Write a new FTC program | |
| Robot configuration section | The device names on the Control Hub. Each row: device type, name, ×. | Set up the robot configuration | |
| Device type | Motor (DcMotor), Servo, Continuous rotation servo (CRServo), IMU. | Set up the robot configuration | |
| Device name | Starts with a letter and uses letters, digits and _. When the name changes, the blocks that use that device take the new name too. |
Set up the robot configuration | |
| × | Removes the device from the list. | Set up the robot configuration | |
| + Add device | Adds a new motor to the list (motor1, motor2...). |
Set up the robot configuration | |
| OnBot Java section | The Java code generated from the blocks. Its heading shows the file name (for example ProbotOpMode.java). You cannot type in it. |
Save the program, open it and get the Java code |
FTC examples window
It works the same as the "Probot examples" window: Search examples..., example cards and ×.
On a narrow screen
If the window is 860 pixels wide or narrower, the regions stack one under another. The side panel moves below the workspace, and the panel handle is hidden.
On a phone, the intro card reads "Coding tool is made for a computer". Continue anyway becomes active after 3 seconds.