Short answer: Unplugged coding means teaching concepts like algorithms, loops, conditions, variables and data without a computer, through games and role play. The 10 activities in this post need only paper, pencils and the board. For each one we list the time, the steps and the learning outcome it matches. The most important rule: at the end of every activity, take 5 minutes to talk about the question "what does this correspond to on a computer?" Without that bridge, the activity stays a fun game.
Is it in the curriculum?
Yes. The new Robotik Kodlama (Robotics Coding) curriculum used in Turkish middle schools in 2026-27 explicitly asks for unplugged teaching in the first item of its implementation principles: if access to computers, robotics kits or digital tools is limited, teaching should be supported with an "unplugged computing" approach and concrete materials. The curriculum also lists the methods one by one: creative drama (role play), coding cards, logic games, circuit diagram drawings and physical modeling.
The grade 5 and grade 6 teacher guides for the Bilişim Teknolojileri ve Yazılım (Information Technologies and Software) course also have a separate "Unplugged Classroom Steps" section under many activities. For example, in the grade 5 activity "I Explore Inside Software," decision, loop and operation blocks are represented with colored cardboard. In the grade 6 activity "Unplugged AI Model: Learning and Predicting with Cards," one student becomes the "model" and the others become "trainers."
Does it work, and where does it fall short?
Research is generally positive, but with a warning:
- A meta-analysis published in 2023 (Chen et al.) found a large effect of unplugged activities on students' computational thinking skills (13 studies, Hedges' g about 1.03). The same authors also note that earlier findings were inconsistent.
- In a study with second graders (del Olmo-Muñoz et al., 2020), the group that moved from unplugged activities first to computer activities next got better results.
- In a middle school study (Taub, Armoni and Ben-Ari, 2012), students' ideas about computer science partly improved, but their intention to study computer science in the future went down. The authors' recommendation: the activity should be explicitly connected to the concept it represents.
The practical conclusion: an unplugged activity does not fully replace the computer. It settles the concept before the computer. If you have a lab, put the activity in the first class and the same concept on the computer in the second. If you don't have a lab, close each activity by drawing blocks or a flowchart on the board. For choosing a tool for the second class on the computer and the flow of the first four classes, see our post What is block-based coding?.
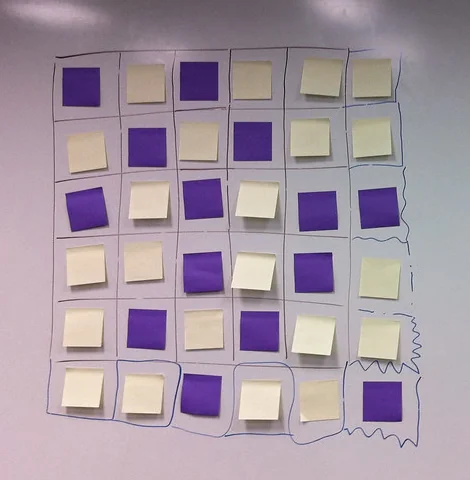
All the materials for an unplugged activity: sticky notes in two colors and a grid drawn on the board. The grid in activity 1 or the pixel picture in activity 7 can be enlarged on the board the same way. Photo: Ben Chun, CC BY-SA 2.0, Flickr, cropped.
The 10 activities at a glance
| No | Activity | Concept | Time | Curriculum link |
|---|---|---|---|---|
| 1 | Program on grid paper | Sequence of commands, loop | 40 min | RK1.1.3, BTY.5.6.1 |
| 2 | The broken recipe | Testing, debugging | 30 min | RK1.1.4, BTY.5.6.2 |
| 3 | The if-else game | Condition | 20 min | BTY.5.6.3 |
| 4 | Find the repeat | Loop, nested loop | 20 min | BTY.5.6.3 |
| 5 | Variable envelopes | Variable, constant | 30 min | BTY.5.6.3 |
| 6 | Binary number cards | Representing data with 0 and 1 | 30 min | Data representation (indirect) |
| 7 | Pixel pictures and compression | Image representation | 40 min | Data representation (indirect) |
| 8 | Find the number in seven questions | Searching, efficiency | 15 min | BTY.5.6.1 |
| 9 | AI with cards and biased data | Model, training data | 35 min | BTY.6.5.3 |
| 10 | Acting out a sensor, controller and LED | Input, processing, output | 30 min | RK1.1.1, RK1.1.3 |
The links are our own matching. Activities 6 and 7 have no one-to-one match in the curriculum. They lay the groundwork for the topic of data and sensor values.
1. Program on grid paper
Materials: A grid notebook page, a pencil. Time: 40 min.
- Draw a 4x4 grid on the board. The top left corner is the start. Four commands will be used: → (one square right), ← , ↓ , and ■ (color the square you are on).
- Make a simple pattern together (for example the letter L) and write its program on the board: ■ ↓ ■ ↓ ■ → ■ → ■.
- Students work in pairs. Each one secretly colors a pattern on their own 4x4 grid and writes its program on a separate sheet. They swap sheets, and the partner draws the pattern by looking only at the program.
- Compare the two drawings. If they differ, is the mistake in the program or in how it was carried out?
- Last 10 minutes: ask "how can we shorten writing → → →?" Write the notation the students suggest themselves (for example 3 x →) on the board and give it its name: a loop.
- If there is time, or in the next class, play a second round: a 6x6 grid and a fifth command ↑ (one square up). Patterns that go up and down also give richer repeats to shorten.
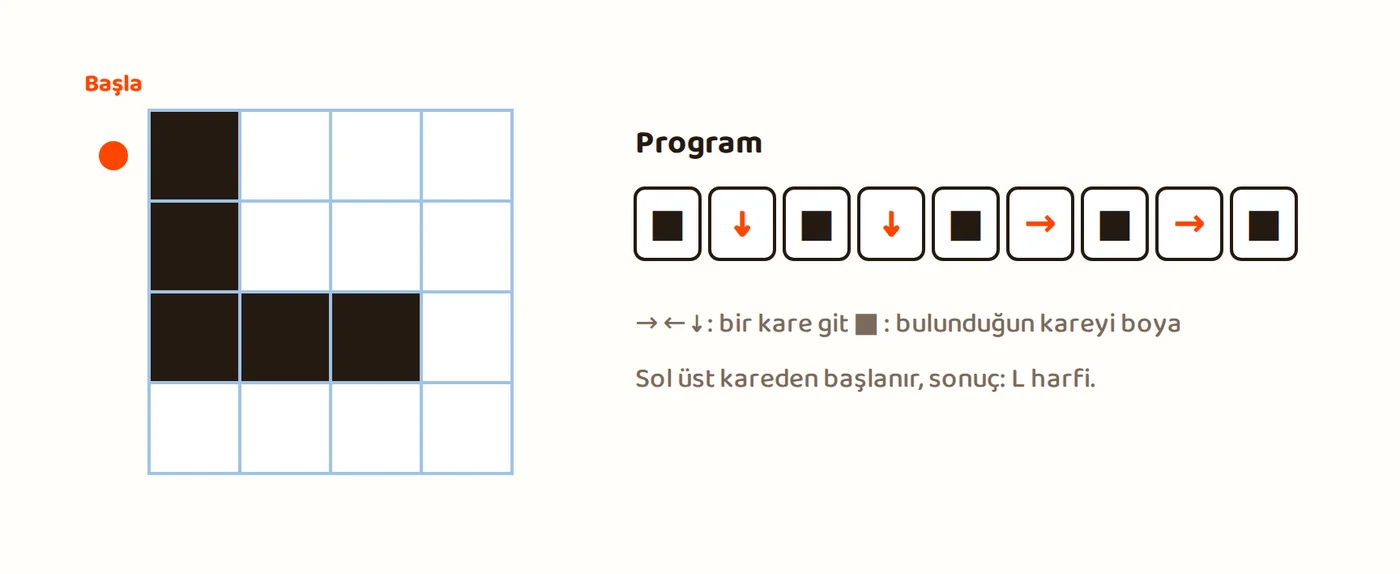
On the computer: The "move forward," "turn" and "repeat" blocks in block-based environments. The result changing when the order of the commands changes is the program running in sequence.
2. The broken recipe
Materials: The board. Time: 30 min.
- Write a deliberately wrong algorithm on the board. Example: "Brushing teeth: 1) Put on the toothpaste. 2) Pick up the toothbrush. 3) Brush your teeth. 4) Turn on the tap. 5) Rinse your mouth."
- One student acts out the algorithm word for word. When the toothpaste can't be put on because the brush isn't in hand yet, the class finds the mistake on its own.
- Give the groups other broken recipes: brewing tea, packing a school bag, using a crosswalk. In each group there should be at least one order mistake and one missing step.
- The groups find the mistake, fix it and try the corrected algorithm with "sample input": "What if it's raining?", "What if the light is red?"
The "I Test My Algorithm" activity in the grade 5 teacher guide builds the same idea with a "getting to school on time in the morning" scenario, with times and durations. If your class is ready, that scenario is harder and more realistic.
On the computer: Running the program and comparing it with the expected result is testing. Finding where the mistake is and fixing it is debugging. The question "What if it's raining?" is trying the program with different inputs.
3. The if-else game
Materials: The board. Time: 20 min.
- Write a rule on the board: "IF the number I say is even, stand up, ELSE raise your hand."
- Say numbers, and the class follows the rule. Then make the rule harder: "IF the number is greater than 10 AND even, stand up, ELSE sit down."
- One of the students becomes the rule maker. They must write their rule on the board first.
- In the last round, write a deliberately vague rule: "IF the number is big, stand up." When the class objects "what does big mean?", the topic opens up: a computer can't run a vague condition, the condition must come out as true or false.
On the computer: The "if ... then, else" block and logical operations like "and" and "or."
4. Find the repeat
Materials: The board. Time: 20 min.
- Write a sequence of moves on the board: "clap, clap, jump, clap, clap, jump, clap, clap, jump". The class does it together.
- "How can we write this shorter?" The students will most likely suggest "repeat 3 times: clap, clap, jump."
- Give a longer sequence and write the repeat inside it as a repeat too: "repeat 3 times: (repeat 2 times: clap), jump".
- Groups write their own move sequences, and the other group first reads the shortened version and acts it out.
On the computer: The "repeat" block and nested loops. A program that draws a square is written as "repeat 4 times: move forward, turn right."
5. Variable envelopes
Materials: 3 envelopes or folded sheets of paper, with labels on them. Time: 30 min.
- Write labels on three envelopes: "score," "lives," "player name." Put a slip of paper in each: 0, 3, Elif.
- Run a "game program" on the board: "add 10 to score," "subtract 1 from lives," "IF lives is 0, end the game." One student holds the envelopes, and at each command takes out the slip, erases the old value and writes the new one. Run the program for three rounds. In the third round lives becomes 0 and the students see the condition come true.
- Ask the class: did the name of the envelope change, or the value inside it? The answer is the concept itself.
- Comparison: information whose value never changes, like "how many minutes are in an hour," does not need an envelope. These are constants.
The grade 5 guide has an activity for this topic called "Constant or Variable?" The guide suggests reinforcing the concept through games the students play, like soccer or hide-and-seek.
On the computer: In block-based environments, the "Make a Variable," "set [variable] to ..." and "change [variable] by ..." blocks. In robotics, the value read from a sensor is also kept in a variable.
6. Binary number cards
Materials: 5 small slips of paper for each student. Time: 30 min.
- Students draw 16, 8, 4, 2 and 1 dots on the slips, in that order. The cards are lined up from left to right, largest to smallest.
- Rule: a card is either face up (the dots are visible) or face down. Face-up cards are called 1 and face-down cards 0.
- "Show 13." Students turn up 8, 4 and 1. Write 01101 on the board.
- Ask the reverse: what is 10010? (16 + 2 = 18). What is the largest number you can show with 5 cards? (31)
- Instead of turning cards over, you can also play by switching a light on and off.
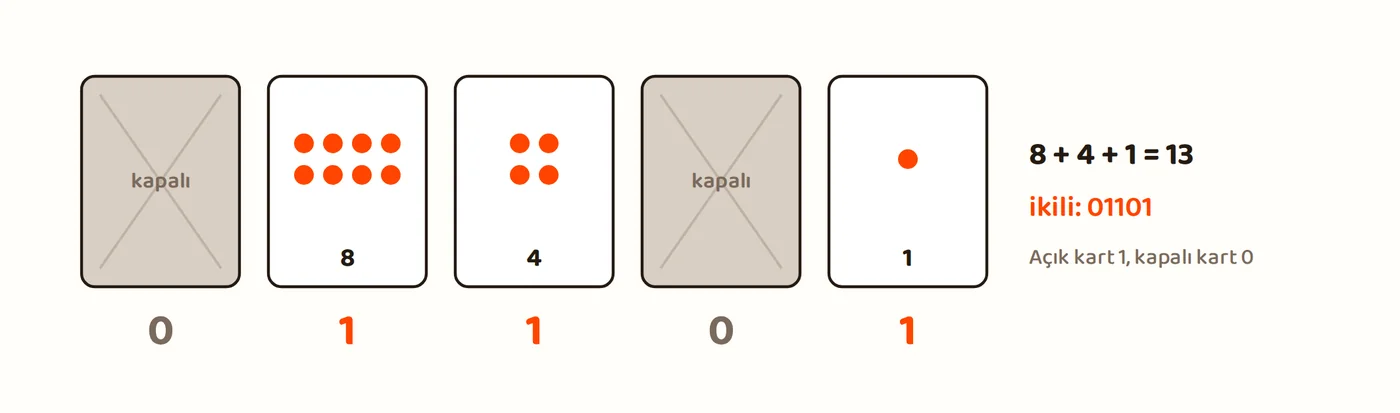
On the computer: A computer stores everything with 0 and 1. In a robotics circuit, whether a button is pressed or not, or whether an LED is on or off, is also two-state information.
7. Pixel pictures and compression
Materials: Grid paper. Time: 40 min.
Write a coded 8x8 picture on the board. B means a white (beyaz) square and S a black (siyah) square, and each row is read from left to right:
| Row | Code |
|---|---|
| 1 | 8B |
| 2 | 3B 2S 3B |
| 3 | 2B 4S 2B |
| 4 | 1B 6S 1B |
| 5 | 2B 4S 2B |
| 6 | 2B 4S 2B |
| 7 | 2B 4S 2B |
| 8 | 8B |
- Students draw the picture on grid paper (it turns out to be a house with a roof).
- Question: if we wrote out all 64 squares one by one, we would need 64 letters. How many symbols did we write with this method? (20 pieces, each piece a number and a letter, 40 symbols in total.) Which rows got the shortest? (Rows 1 and 8: a single "8B" instead of 8 letters.)
- The real question: what happens with a row like "SBSBSBSB"? Its code becomes "1S 1B 1S 1B 1S 1B 1S 1B," so it gets even longer. Not every compression method works on every kind of data.
- Students code their own 8x8 pictures and have a classmate decode them.
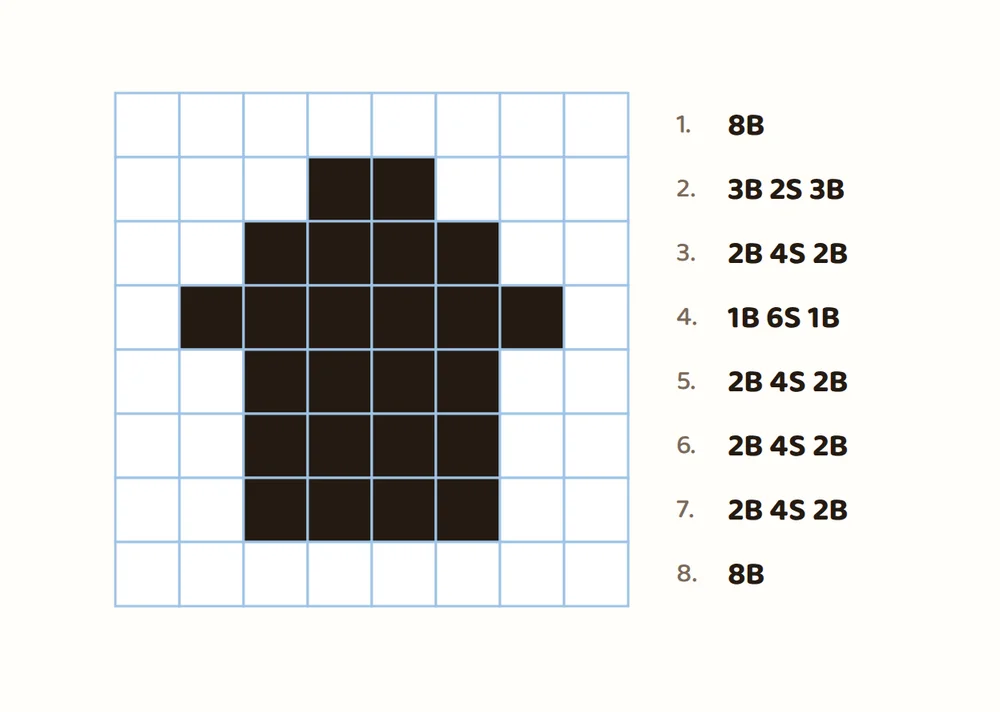
An activity called "Pixel World" in the grade 6 guide also covers the building blocks of a digital image.
On the computer: Every picture on a screen is made of pixels, and files are compressed so they don't take up too much space.
8. Find the number in seven questions
Materials: None. Time: 15 min.
- Think of a number between 1 and 100. The class may only ask questions that are answered with "yes" or "no."
- In the first round, students usually guess one at a time, like "Is it 50?", "Is it 37?", and use up a lot of questions.
- In the second round, give a hint: "Can you rule out half of the remaining numbers with each question?" A class that goes "Is it greater than 50?", "Is it greater than 75?" finds it in at most 7 questions, because halving 7 times brings 100 numbers down to one.
- Question: how many questions are needed between 1 and 1000? (10)
On the computer: Binary search. Of two algorithms that solve the same problem, one can finish in far fewer steps. An algorithm should not only be correct, it should also be efficient.
9. AI with cards and biased data
Materials: 20-30 small slips of paper, red and blue pens. Time: 35 min.
- Use the basic setup of the "Unplugged AI Model" activity in the grade 6 guide: one student in the group is the "model," and the others are "trainers." The trainers show the cards one by one and say which class each belongs to. The model tries to work out the rule on their own.
- Our addition: use two made-up classes the model has never seen before, for example "zork" and "blip." Known animals like cats or dogs don't work, because the model student already knows them and won't look at the examples you give. The trainers know that the real feature of a zork is being round and of a blip being angular, but they deliberately prepare unbalanced training cards: all zorks are red round shapes, all blips are blue angular shapes.
- After training, show the model cards it has never seen: a blue round shape and a red angular shape. If the model looks at color, it gets both wrong. Since color and shape always changed together on the training cards, it had no way to tell which one mattered. If the model looks at shape and gets both right, the discussion is still the same: the training data was not enough to separate color from shape, and the model picked the right feature by luck. Then play one more round and ask the model to look at color this time.
- Discussion: What did the model learn, and what did we think we were teaching? What would a better training set look like?
On the computer: AI models learn from examples. If the training data is unbalanced, the model learns to look at the wrong feature. This is a good introduction to the AI theme and the ethics discussions in grade 6.
10. Acting out a sensor, controller and LED
Materials: Cards with numbers from 0 to 100 written on them, the board. Time: 30 min.
This activity is specific to the Robotik Kodlama course and prepares for the circuit work in theme 3.
- Three roles: Light sensor, Controller (the program inside the board), LED. The sensor student reads the card you show and says the number out loud. The card is the light level of the room.
- The controller's program is written on the board: "Repeat forever: Read the value from the sensor. IF the value is less than 30, tell the LED 'on', ELSE tell it 'off'."
- The LED student stands up when told "on" and sits down when told "off." The class has watched a system that works like a night light.
- Add a bug: erase the "repeat forever" line from the program. The controller reads the value once and stops, and when you change the card the LED doesn't react. The class sees for itself why robotics programs run inside a forever loop. With a real sensor, the range of values depends on the board and the sensor, and a threshold like 30 is chosen by measuring the room.
- Extension: add a "buzzer" student and a second threshold. "IF the value is less than 10, turn on the LED and sound the buzzer."
- Last step: the groups draw a flowchart of this system.
On the computer: Input (sensor), processing (the program on the controller board) and output (LED, buzzer). The threshold and the forever loop are exactly the night light program that will be built in theme 3, in a simulation environment and in a real circuit.
Choosing worksheets from the internet
A search for "unplugged coding activities" turns up lots of PDFs. These are the problems we often saw in the samples we reviewed:
- Wrong age level. Some were made for kindergarten and elementary school and circulate with a "middle school" label. For grades 5-6 these quickly get boring.
- Always the same concept. Most are of the "lead the character to the goal with arrows" type. Conditions, variables, testing and data representation are very rare.
- No goal and no answer key. They don't say which learning outcome they serve, how long they take or what the solution is.
- Not "no materials." Most need color printouts. In schools with limited photocopying, activities that can move to the board are more useful.
- Unclear source and license. Pages adapted from international projects often don't credit their source.
When you choose a worksheet, ask yourself: at the end of this activity, when I ask a student "what does this correspond to on a computer?", is there an answer they can give?
Ready-made resources
- Teacher guides from the Ministry of National Education (MEB). The grade 5 and grade 6 teacher guides for Bilişim Teknolojileri ve Yazılım are on the TYMM (Türkiye Yüzyılı Maarif Modeli, Türkiye Century Education Model) website. The "Unplugged Classroom Steps" sections of the activities can be used directly.
- CS Unplugged. A project of the University of Canterbury in New Zealand. Its new site is in English and gives the age, time and discussion questions for each lesson. Its old site has Turkish PDFs of the first eight activities. The content of the new site is under Creative Commons Attribution-ShareAlike, and the activities on the old site are under Creative Commons Attribution-NonCommercial-ShareAlike. The Turkish PDFs, however, carry an old note saying "may be copied for classroom use only." You are free to use them in your class in either case. Activities 6, 7 and 8 in this post are based on ideas from this project.
- Bilge Kunduz (Bebras). The Türkiye site of the international computational thinking challenge has tasks from past years. It can be used as a bank of unplugged problems. According to the announcement on the site, the 2026 challenge will be held in person on November 28, 2026, with registration closing on October 31. Check the participation requirements on its site.
If you want to fit these activities into a yearly plan, our post Elective Robotik Kodlama yearly plan 2026-27 has the weeks of theme 1. For the flow of the first two class periods, you can also look at the "teacher robot" activity in the post What happens in a Robotik Kodlama class?.
Sources
- MEB, Robotik Kodlama Dersi Öğretim Programı (Ortaokul) (Robotics Coding curriculum, middle school), implementation principles, item 1. tymm.meb.gov.tr
- MEB, Bilişim Teknolojileri ve Yazılım Dersi Öğretim Programı (Information Technologies and Software curriculum). tymm.meb.gov.tr
- MEB, Bilişim Teknolojileri ve Yazılım Dersi 5. Sınıf Öğretmen Kılavuz Kitabı (grade 5 teacher guide) ("I Test My Algorithm," "I Explore Inside Software"). tymm.meb.gov.tr
- MEB, Bilişim Teknolojileri ve Yazılım Dersi 6. Sınıf Öğretmen Kılavuz Kitabı (grade 6 teacher guide) ("Unplugged AI Model: Learning and Predicting with Cards," "Pixel World"). tymm.meb.gov.tr
- Chen, P., Yang, D., Metwally, A. H. S., Lavonen, J. and Wang, X. (2023). Fostering computational thinking through unplugged activities: A systematic literature review and meta-analysis. International Journal of STEM Education. doi.org
- del Olmo-Muñoz, J., Cózar-Gutiérrez, R. and González-Calero, J. A. (2020). Computational thinking through unplugged activities in early years of Primary Education. Computers & Education. doi.org
- Taub, R., Armoni, M. and Ben-Ari, M. (2012). CS Unplugged and middle-school students' views, attitudes, and intentions regarding CS. ACM Transactions on Computing Education. doi.org
- CS Unplugged, Computer Science Education Research Group, University of Canterbury. csunplugged.org and the old site for the Turkish PDFs: classic.csunplugged.org
- Bilge Kunduz (Bebras Türkiye), task archive. bebras-tr.com
Sources accessed: October 6, 2026.