Short answer: Robotik Kodlama (Robotics Coding) is an elective course taught in middle schools in Türkiye in grades 5 and 6, 2 hours a week. A student can choose this course at most twice. Starting with the 2026-27 school year, a new curriculum applies to students who choose the course for the first time. The new curriculum has two levels. At level 1, students build algorithms, write code in an online block-based environment, build simple circuits first in a simulation and then with real parts, and develop a small robotic product. Level 2 adds artificial intelligence concepts, offline coding environments and more advanced products.
In this post we tried to turn the official curriculum text into something useful in the classroom: how many hours go to each theme, what students are expected to do in each theme, where you can start without materials, and a sample two-period lesson flow.
How many hours is the course, and who can choose it?
In the weekly course schedule of the Talim ve Terbiye Kurulu (Board of Education), Robotik Kodlama is listed among the electives in the "Human, Society and Science" group. It is 2 hours a week in grades 5 and 6, and the "(2)" next to the course name shows that the course can be taken at most twice.
According to the notes of the schedule, elective course curricula are modular. A school can gather elective class periods on one day of the week. This way, a shared group can be formed from students who are in different grades but at the same level in the elective they chose. The schedule gives the example through a different course, but the principle is the same: for grade 6 students choosing the course for the first time, the school can form a level 1 group together with grade 5 students.
What is in the 2026-27 curriculum?
With the Board's decision dated August 7, 2026, the new Robotics Coding Course Curriculum is being phased in, starting with students who choose the course for the first time. The old curriculum from 2023 is being phased out in the same way. The curriculum is made up of four themes, and each theme is taught separately at two levels.
| Theme | Level 1 | Level 2 |
|---|---|---|
| 1. Introduction to Robotic Systems and Basic Programming | 8 hours | 8 hours |
| 2. Robotic System Development Environments and Components | 16 hours | 6 hours |
| 3. Robotic Circuit Design | 22 hours | 22 hours |
| 4. Robotic Applications at Different Levels | 22 hours | 32 hours |
| School-based planning | 4 hours | 4 hours |
| Total | 72 hours | 72 hours |
The hours come from the curriculum's own time table; 72 hours equals 36 weeks at 2 hours a week. The theme pages of the same curriculum text, however, say 6 hours for Theme 1 and 18 hours for Theme 2 at level 1, and 6 hours for Theme 1 at level 2. The difference is a few hours and does not change the overall plan, but when you prepare your yearly plan, know that both numbers appear in the official text. The school and the subject teachers' group plan the school-based planning hours themselves. The curriculum does not require any specific brand, robot kit or software. The learning outcomes are written in general terms such as "online block-based environment", "online simulation tool" and "hardware components".
What do students do at level 1, theme by theme?
Theme 1: Introduction to robotic systems and basic programming (6-8 hours)
Students learn the basic concepts of robotic systems and relate them to daily life. They discuss ethics, safety and privacy risks in robotics coding. They choose a daily-life problem that a robot could solve, identify the problem's inputs and outputs, list the processing steps and show them with a flowchart. Finally, they try their algorithm with sample inputs and debug it.
This whole theme can be taught without computers. The curriculum's implementation principles also recommend this clearly: to make sense of robotics concepts and algorithmic processes without digital tools, they ask for planned use of methods such as creative drama, coding cards, logic games, circuit diagram drawing and physical modeling. A few activities that work:
- Robot or not? Hand out cards such as automatic door, calculator, robot vacuum, refrigerator and traffic light to groups. Each group sorts the cards with the questions "Does it sense? Does it decide? Does it do a job?" Debatable cards like the refrigerator and the calculator are there on purpose. At the end of the discussion, you give the definition you will use ("it senses, decides and does a job") and the word sensor; settle the definition before class.
- Teacher robot, then pairs: The goal is to reach a point in the classroom. Students first write a sequence of commands on paper using only "one step forward", "turn right" and "turn left". You carry out what is on the paper exactly. If commands are called out live, mistakes get fixed right away, and the task stops being an algorithm and turns into a remote control. If the sequence leads you into a wall, stop one step before and ask, "What does the program want from me here?" After a 5-minute example, students split into pairs: one is the programmer, the other moves the robot. In a crowded class, everyone cannot walk between the desks at once; so in pairs, the robot is an eraser or a pen cap sitting on graph paper on the desk, and the goal is a square on the paper. This way most of the class does not just watch.
- Flowchart: First introduce the shapes: oval for start and end, rectangle for a process, diamond for a decision, arrows for the direction of flow. The first chart has one decision and no loop: "If it is raining, take your umbrella." The second chart can be "When it gets dark, turn on the garden light"; this one also needs an arrow that goes back, that is, a loop. Then have groups swap charts and test them: "According to this chart, does the light turn on during the day?" This directly meets the testing and debugging outcome in the curriculum.
- Privacy question: Imagine a robot vacuum with a camera filming the inside of a home. Where should the footage be stored, and who should be able to see it? A five-minute discussion is a good enough start for the ethics and privacy outcome.
Theme 2: Robotic system development environments and components (16-18 hours)
Students get to know online block-based software development environments, choose the one that fits their purpose and prepare the environment for use. They identify, use and evaluate the interface, the toolbox, the code blocks and the code flow.
This theme does not need a robot, but it does need computers with an internet connection. In many schools the information technology classroom's hours are assigned at the start of the term, so it is a good idea to book the room early. Choosing an environment that runs in the browser and works without creating an account cuts the time lost in the first lessons. Also, most platforms that require an account ask for parental consent for young users. A practical tip: in the first two lessons, have students do the same small task (for example, making a character or a virtual robot draw a square) in two different environments and compare the interfaces. That is exactly the "identifies the environment" outcome in the curriculum. If you settle the use of repetition and conditions in blocks during this theme, students carry less load when they build circuits in Theme 3.
Theme 3: Robotic circuit design (22 hours)
Students first use online simulation tools to build, run and evaluate a robotic circuit model aimed at a real-life problem. Then they do the same work with hardware components. In a block-based environment, they plan, create, test and debug the robotic program. The key concepts are sensor inputs, output units and circuit connections.
Starting with simulation follows the curriculum's order, and it is a lifesaver if you have few kits in the classroom. A commonly used sequence:
- Blink an LED (output unit). The LED's long leg connects to the positive side, and a resistor is used in series with the LED. An LED connected without a resistor can burn out, and it also strains the board's output. These are the two most common mistakes in the first real circuit.
- Light an LED when a button is pressed (input and condition). The button input needs a resistor; if your board supports it, you can enable the board's internal resistor in software instead. If you skip this, the input floats and the LED blinks on its own, and the student blames the code. This is often why a circuit that works in simulation flickers in real life. When the internal resistor is enabled, the input reads low while the button is pressed, so build the condition accordingly.
- A night light that turns on when it gets dark (light sensor, threshold value).
- A warning sound that changes with an obstacle (distance sensor). Two thresholds are enough: if the obstacle is very close, a fast beep; if close, a slow beep; if far, no sound. This is solved with an "if, else if" block and teaches the logic of a parking sensor. Converting distance proportionally into a wait time is heavy for grades 5-6 and can be left for later.
If each step first runs in the simulation and is then built with real parts, students start telling on their own whether a problem in the real circuit comes from the wiring or the code. For the curriculum's "evaluates the process and its results" outcome, it is enough for each group to keep a short note: "what we tried, what happened, what we changed".
Theme 4: Robotic applications at different levels (22 hours)
Students develop a basic product integrated with robotic systems: they identify the requirements, choose tools and materials, build the product and make it work so that it meets the set criteria. The key concept is the prototype.
You can think of this theme as an end-of-term project. Writing the criteria together with students at the start makes assessment easier. Example: "A device that gives a warning when the soil in a flower pot dries out. Criteria: it gives a warning within 5 seconds when the soil dries, it gives no warning in wet soil, and the device fits the pot." Three criteria also tell students what they will test. A calibration step comes before the criteria: students measure and note the values the sensor reads in a cup of dry soil and in a cup of wet soil, and the threshold is picked between these two numbers. If this step is skipped, the "gives no warning in wet soil" criterion will not hold. Keep the board and the wires away from water during testing. Cardboard and scrap materials are enough for the body.
What changes at level 2?
Students who choose the course a second time work through the same four themes at a more advanced level:
- Theme 1 (6-8 hours): Artificial intelligence concepts in robotic systems, ethics and safety in AI applications. The key concepts are data, machine learning and information security.
- Theme 2 (6 hours): Offline coding environments. Installing the environment on a computer, the concept of compiling code.
- Theme 3 (22 hours): Hardware-based programming, testing and debugging in an offline environment.
- Theme 4 (32 hours): Developing an advanced robotic product and an AI-supported product.
Since level 2 calls for an offline environment, it is a good idea to talk to the person in charge of IT before the term starts about whether you are allowed to install programs on school computers.
What if the school has no robot kit?
Close to half of the level 1 hours can be taught without a kit. Theme 1 runs on paper and the board, Theme 2 on computers, and the simulation part of Theme 3 also on computers. The "using hardware components" outcome in Theme 3 and the product development in Theme 4 (22 hours), however, need hardware.
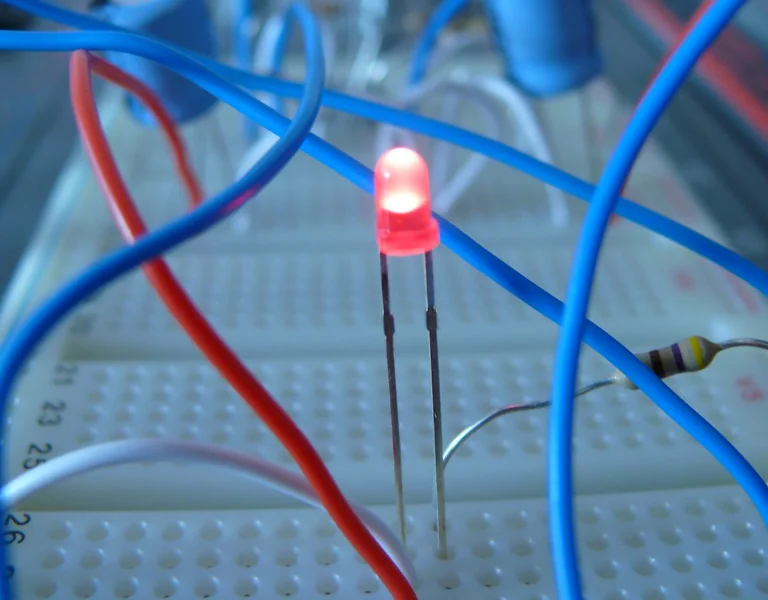
A real circuit: an LED and a resistor plugged into a breadboard. Photo: wgossett, CC BY-SA 2.0, Flickr, cropped.
If the school has only one kit, having groups take turns building with it within one lesson is not realistic: a class of 30 makes 6-8 groups, and 40 minutes gives each group 5 minutes. A better way is for you to demonstrate with the kit at the start of each new circuit, and then for the groups to take the kit in turns, week by week. Groups that do not have the kit that week build the same circuit in the simulation.
A sample two-period lesson flow (Theme 1, algorithms)
A suggestion for two class periods (40 + 40 minutes):
- 10 min: The "Robot or not?" card activity. At the end, you give the definition and the word sensor.
- 15 min: Teacher robot. 5 minutes of example with you, then in pairs one is the programmer and the other moves the eraser or pen cap on the graph paper. Commands are written on paper first.
- 15 min: The concepts of algorithm, input and output, and the flowchart shapes on the board. The "If it is raining, take your umbrella" chart is drawn together. (The break comes after this step.)
- 25 min: Groups draw the flowchart for one of 3-4 ready-made problem cards. Sample cards: "Turn on the garden light when it gets dark", "Open the door when the bell is pressed", "Turn on the fan when the room gets warm". A group that wants to can choose its own problem.
- 10 min: Groups swap charts, and each group looks for a mistake or a missing piece in the chart it received.
- 5 min: Wrap-up: a one-sentence exit card with the question "How did we find a mistake today?"
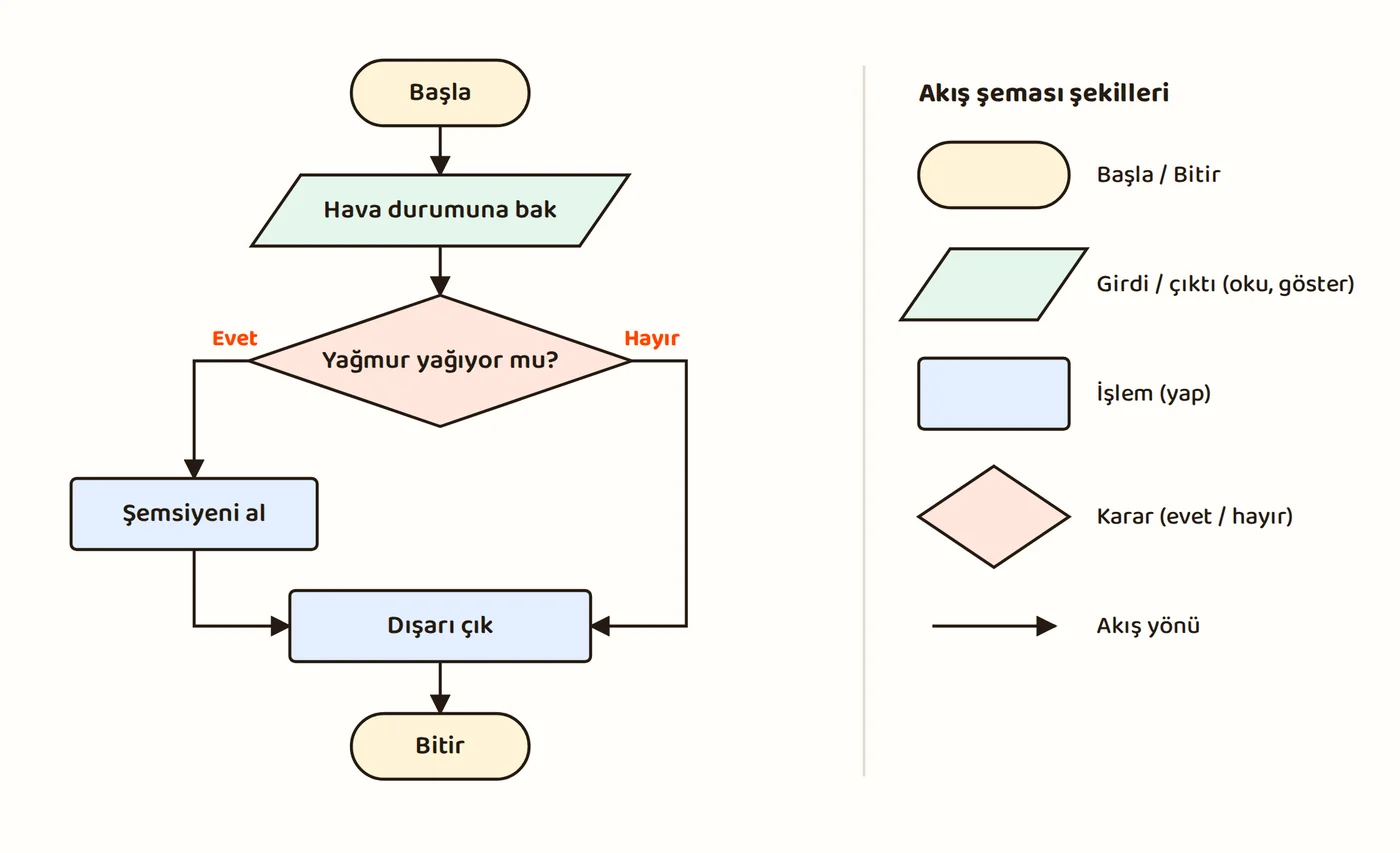
This flow touches three of Theme 1's four learning outcomes (concepts, algorithmic thinking, testing). You can leave the ethics and privacy outcome for the opening of the following week.
Is there a textbook for the course?
On the textbooks page of the Ministry of National Education's (MEB) Türkiye Yüzyılı Maarif Modeli (Türkiye Century Education Model), no textbook appears listed for the middle school Robotik Kodlama elective as of October 6, 2026. If this changes, we will update this post.
Timeline for those who want to open the course next year
According to the regulation change published in the Resmî Gazete (Official Gazette) on July 28, 2026, the electives for the following year are announced to students by the school principal's office in January-February, and students also make their choices in January-February. Courses that cannot open because a group could not be formed are announced by the school administration. The choices of students just starting grade 5, and any changes, are made in the first week of the school year. For a teacher who wants to open the course next year, the best time to introduce the course to students and parents is December.
Sources
- Talim ve Terbiye Kurulu, İlkokul ve Ortaokul Haftalık Ders Çizelgesi (Board of Education, primary and middle school weekly course schedule; decision no. 4, 2025). ttkb.meb.gov.tr
- Talim ve Terbiye Kurulu, Robotik Kodlama Dersi Öğretim Programı (Robotics Coding Course Curriculum) decision, August 7, 2026 (decision annexes). dhgm.meb.gov.tr
- Türkiye Yüzyılı Maarif Modeli, middle school Robotik Kodlama course theme pages (updated August 26, 2026). tymm.meb.gov.tr
- Ortaokul Robotik Kodlama Dersi Öğretim Programı (Middle School Robotics Coding Course Curriculum), PDF (time table, section 1.3). tymm.meb.gov.tr
- Türkiye Yüzyılı Maarif Modeli, Ders Kitapları, Temel Eğitim (textbooks, basic education). tymm.meb.gov.tr
- Resmî Gazete, July 28, 2026, regulation change (choosing electives, art. 5/A). resmigazete.gov.tr
Sources accessed: October 6, 2026.