What we'll do
- Look inside a servo and see how it holds an angle.
- Set the angle yourself with pulse width in a live sandbox.
- Wire a servo to an Arduino and write a sweep sketch and a potentiometer sketch.
- Cover 360 degree servos, servo vs stepper vs DC motor, and the power mistakes that reset boards.
Why it's useful: for a robot arm, a flap that opens or a gripper, a servo is the shortest path: one signal wire, one line of code, the angle you asked for.
What is a servo motor used for?
A servo motor turns to the angle you give it and stays there. Hobby servos like the SG90 usually cover about half a turn and are controlled through a single signal wire.
- Robot arms: joints and grippers
- Doors and flaps: lids, a model parking gate
- Steering on RC cars, and turning a sensor (an HC-SR04 "radar")
How does a servo motor work?
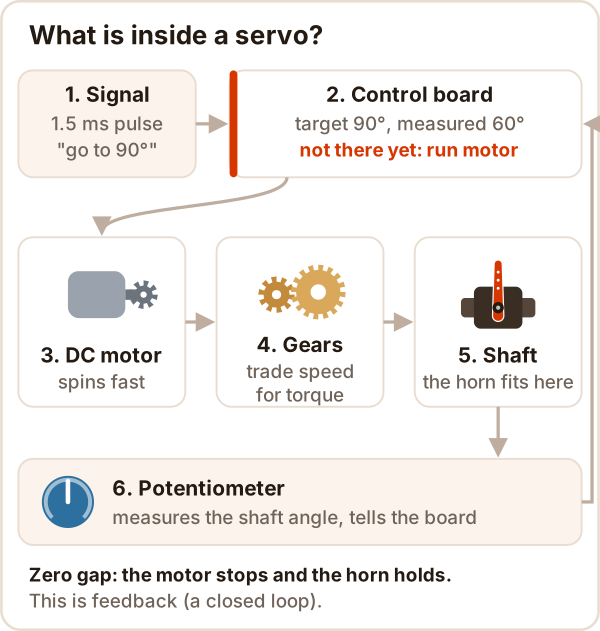
Inside a servo there is a small DC motor, a gear train, a potentiometer and a control board. The board compares the angle you asked for with the angle the potentiometer measures, and runs the motor until the gap is gone.
- Gears slow the motor down and multiply its torque.
- The potentiometer measures the output shaft angle (what is a potentiometer?).
- Push the horn by hand and the board sees the gap and pushes back: the servo holds its angle.
How do you set a servo's angle?
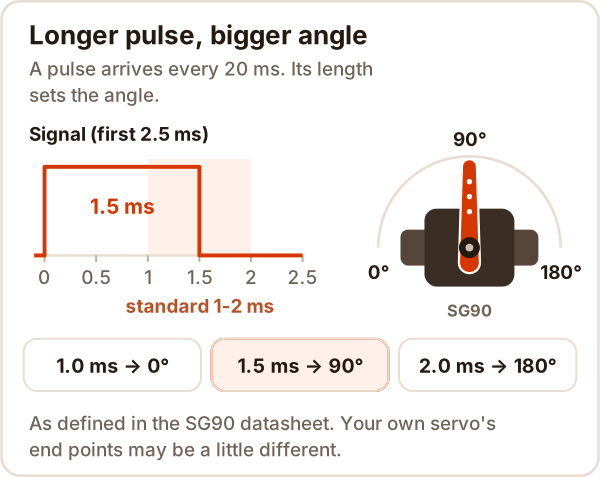
Pulse width sets the angle: the Arduino sends a short 5 V pulse every 20 ms, and the servo only looks at how long that pulse lasts. Per the SG90 datasheet, 1.5 ms is the middle, about 1 ms is one end and about 2 ms is the other.
The Arduino Servo library maps angles onto a wider range by default:
| Command | Pulse it sends |
|---|---|
servo.write(0) |
544 µs |
servo.write(90) |
1472 µs |
servo.write(180) |
2400 µs |
servo.writeMicroseconds(1500) |
1500 µs |
That range is wider than the standard 1-2 ms, so some servos hit their end stop at write(0) or write(180) and buzz. The Arduino docs warn that this is a high current state. The fix is below: find your servo's real end points.
Try it yourself
Drag the slider: stay between 1000 and 2000 µs first, then push to the ends. Then switch to 360° continuous servo; the same signal now means speed and direction.
This is a sandbox where you change the pulse width with a slider and see the 20 ms signal, the servo horn angle and the matching Arduino line. It needs JavaScript; if it did not load, the table and the picture above show the same relationship.
How do you connect a servo to an Arduino?
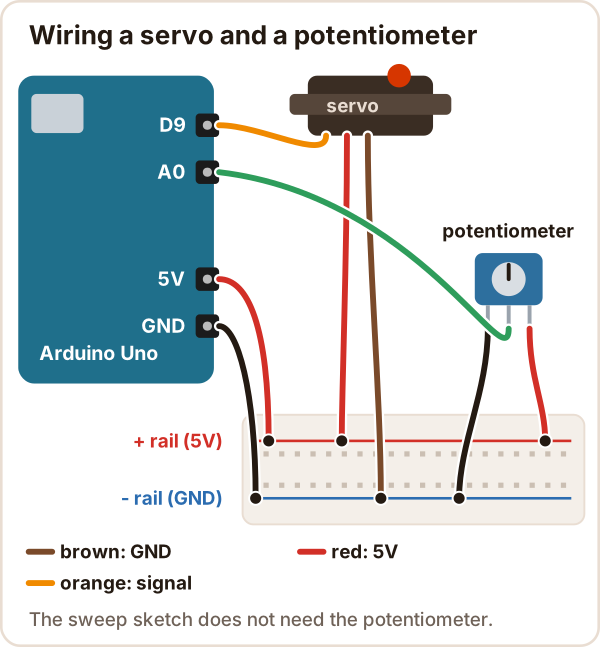
A servo has three wires: ground, power and signal. The signal wire goes to a digital pin; we use D9 in the examples.
| Servo wire | Uno pin |
|---|---|
| Brown or black | GND |
| Red | 5V (for one small servo) |
| Orange, yellow or white | D9 |
The servo and the potentiometer share the single 5V pin, so we use the breadboard + and - rails (how to use a breadboard). New to Arduino? Start with what is Arduino?
Why does my servo reset the Arduino?
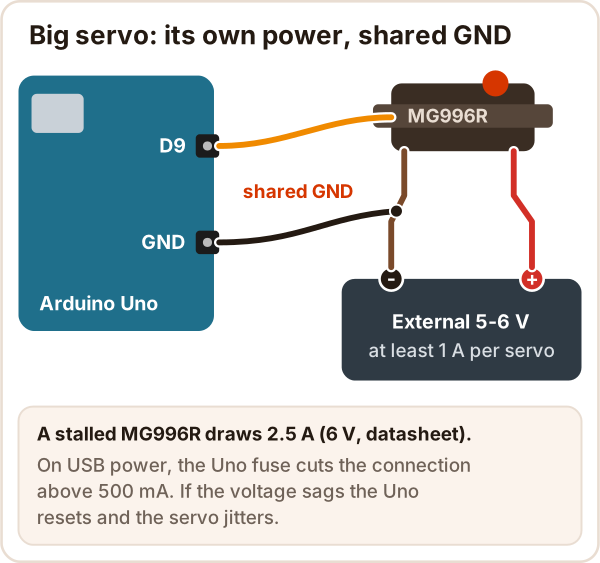
A loaded servo can draw more current than the Uno can supply: the voltage sags, the Uno resets and the servo jitters. One unloaded SG90 can run from the Uno; the Arduino docs suggest a separate supply for more than one or two servos.
- The numbers: a stalled MG996R can draw 2.5 A (6 V, datasheet); the Uno USB fuse trips at 500 mA.
- Voltage: SG90 4.8 V (~5 V), MG996R 4.8-7.2 V. Never wire a servo straight to a 9 V battery or a LiPo pack; put a regulator in between.
- Shared ground is a must: the signal is measured against GND. Without a common ground the servo will not move or will twitch at random.
Arduino servo code
1. Sweep from 0 to 180 and back
#include <Servo.h>

Servo servo;              // the servo object

void setup() {
  servo.attach(9);        // signal wire (orange) on D9
}

void loop() {
  for (int angle = 0; angle <= 180; angle++) {   // 0 to 180
    servo.write(angle);
    delay(15);            // 15 ms per degree: a bigger number = slower sweep
  }
  for (int angle = 180; angle >= 0; angle--) {   // and back
    servo.write(angle);
    delay(15);
  }
}
One direction takes about 2.7 seconds (181 steps × 15 ms).
Controlling servo speed: servo.write() on its own moves at full speed. To slow it down, change the angle in small steps with a delay in between, as above.
2. Control a servo with a potentiometer
#include <Servo.h>

Servo servo;

void setup() {
  servo.attach(9);                       // servo signal on D9
}

void loop() {
  int reading = analogRead(A0);          // potentiometer: 0-1023
  int angle = map(reading, 0, 1023, 0, 180);  // scale to 0-180 degrees
  servo.write(angle);
  delay(15);                             // give the servo time to get there
}
Outer legs to 5V and GND, middle leg to A0. Turn the knob and the servo follows it.
3. Find your servo's real end points
#include <Servo.h>

Servo servo;

void setup() {
  Serial.begin(9600);
  servo.attach(9, 500, 2500);          // widen the limits to 500-2500 µs
  servo.writeMicroseconds(1500);       // start in the middle
  Serial.println("Type a number from 500 to 2500 in the Serial Monitor");
}

void loop() {
  if (Serial.available()) {
    int us = Serial.parseInt();        // read the number you typed
    if (us >= 500 && us <= 2500) {
      servo.writeMicroseconds(us);
      Serial.println(us);
    }
  }
}
Type 1000 in the Serial Monitor, then go down 50 at a time; just inside the point where the servo stops moving or starts to buzz is its real end. Go up from 2000 for the other end. Then use servo.attach(9, min, max): write(0) and write(180) now land exactly on those ends.
What is a 360 degree (continuous rotation) servo?
A continuous rotation servo reads the same signal as speed and direction instead of angle: around 1.5 ms it stops, a shorter pulse spins it one way, a longer pulse the other way.
write(0)is full speed one way,write(180)full speed the other way, and around 90 it stops (Arduino docs).- It does not know its position: you cannot say "go to 90 degrees", only spin for a while.
- If it creeps, turn its trim screw (if it has one) or shift
writeMicroseconds(1500)by a few µs.write(90)sends 1472 µs, so it may creep slowly.
Servo vs stepper vs DC motor
| DC motor | Stepper motor | Servo motor | |
|---|---|---|---|
| What it does | Spins continuously | Turns in steps | Goes to the angle you set |
| Knows its position? | No (needs an encoder) | Counts steps, does not measure | Measures it with its potentiometer |
| Rotation | Unlimited | Unlimited | Usually about half a turn |
| How you drive it | Driver board (L298N) | Driver board (ULN2003) | A signal pin, no driver needed |
| Typical job | Wheels, fans | 3D printers, CNC | Arms, flaps, steering |
A "regular motor" usually means a DC motor: it spins but has no idea where it stopped. More on steppers in how stepper motors work.
Is a servo motor AC or DC? Hobby servos run on DC, around 5 V. Factory CNC machines and industrial robots also use AC servo motors that run from mains power; do not wire those yourself, that is a job for a licensed electrician.
SG90 or MG996R?
| Per the datasheet | SG90 | MG996R |
|---|---|---|
| Weight | 9 g | 55 g |
| Stall torque | 1.8 kgf·cm (4.8 V) | 9.4 kgf·cm (4.8 V), 11 kgf·cm (6 V) |
| Speed | 0.1 s / 60° | 0.17 s / 60° (4.8 V) |
| Operating voltage | 4.8 V (~5 V) | 4.8-7.2 V |
| Rotation | about 180° | about 120° |
kgf·cm: 1.8 kgf·cm means holding back about 1.8 kg at 1 cm from the shaft; on a 3 cm horn, a third of that. This is the stall value, so do not run a servo at that load all the time. Different copies of the SG90 sheet list 1.2 to 1.8 kgf·cm.
Common mistakes
| Symptom | Cause | Fix |
|---|---|---|
| Servo jitters, Uno resets | Not enough power | External 5-6 V supply, shared GND |
| Buzzes and gets warm at one end | Pulse goes past the servo's end | Find the ends, use attach(9, min, max) |
| Does not move at all | Signal on another pin, or no shared GND | Check the attach pin and GND |
analogWrite stops working on D9 or D10 |
On the Uno the Servo library disables PWM on those two pins | Move the LED to 3, 5, 6 or 11 |
| 360 servo will not stop | Its stop point is not exactly 1500 µs | Trim screw, or fine-tune with writeMicroseconds |
| Horn sits at the wrong angle | Horn was pushed onto the spline off-center | Send write(90) and refit the horn centered |
Sources
Accessed: 17 October 2026
- Arduino, Servo library documentation:
write,writeMicroseconds(1000, 1500, 2000 µs, high current warning at the ends), wire colors, separate supply and shared ground, PWM disabled on D9 and D10. - Arduino, Servo library source code (1.3.0): default 544 and 2400 µs, 20 ms refresh, the
map()insidewrite(). - Tower Pro, SG90 datasheet (university copy): weight, torque, speed, voltage, 1, 1.5 and 2 ms positions.
- Tower Pro, MG996R datasheet (Cornell copy): torque, voltage, 2.5 A stall current, about 120° rotation.
- SparkFun, Hobby Servo Tutorial: what is inside a servo, the 20 ms signal, continuous rotation servos, at least 1 A per servo.
- Arduino, UNO R3 product page: USB fuse that trips at 500 mA.
- Arduino, analogWrite(): PWM pins on the Uno.