0.9 Software
Being written
This page is being written and will be updated again on 30 September 2026. For now comments are collected on the Turkish version of this page (language menu): if you find something missing or wrong, you can write it there. The feedback we receive decides what changes in this round.
What you learn in this lesson
How a program decides what the robot does, how the programming tools in FTC differ, and what software that uses sensor data is for.
On a computer, you can click any heading in the section list on the right to jump straight to that section.
Programming the robot's behavior
When you push the gamepad stick forward, the robot's wheels turn. The program running on the robot creates the link between these two events. How far you push the stick becomes a number, the program reads that number and tells the motor how much power to turn with.
The same robot, with the same motors and the same gamepad, can behave in a completely different way. When the program changes, pushing the stick forward might move the arm instead of the wheels, or pressing a single button might make the robot do several jobs one after another. Software decides what the robot does just as much as hardware does.
Think about the limit switch we met in the last lesson. The switch reports that a moving part has reached its limit. That report does not stop the movement by itself. The program has to read the information from the switch and cut the command in that direction. The sensor measures, the program decides. You will see this difference again in the rest of the lesson.
The difference between the driver-controlled part of the match and the Autonomous part also shows up in the program. The driver-controlled program reads the inputs from the gamepad and moves based on them. The Autonomous program carries out tasks set in advance, without any driver input. Reading sensors does not belong to only one of these. In both cases the robot may need measurements.
The program you write runs on the Control Hub on the robot. To prepare the program, though, you need a separate place: an environment for writing code.
Programming environments
FTC software lets you write the same behavior in three different environments. Whichever one you choose, the program running on the robot can do the same job. The difference is how you express the commands and the workspace the environment gives you.
Connecting to the robot
The Blocks and OnBot Java editors live on the robot itself. To work with either of them, you first need to connect your computer to the robot. The Control Hub broadcasts its own wireless network, and you pick that network from your computer's network list and connect.
Once you are connected, you open your browser and type 192.168.43.1:8080 into the address bar. The robot's programming and management interface appears, and you open both editors from here. This address does not go to a website on the internet but to a server running on the robot, so you are not using a website where you open an account.
The network name and password are set during the robot's first setup. Without them, you cannot reach the editor.
Blocks
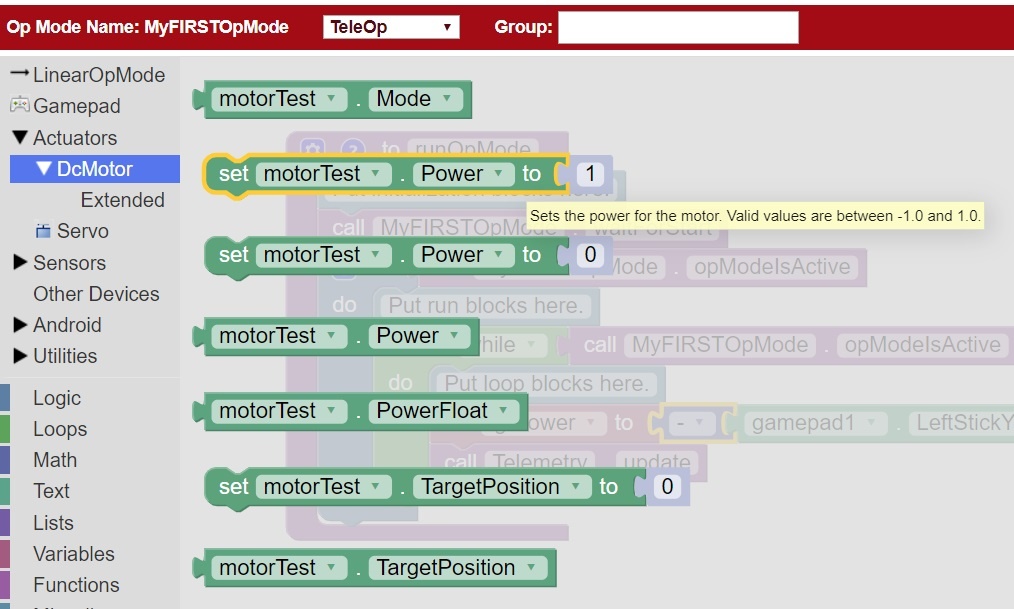
In Blocks, commands come as ready-made pieces. You build the program by dragging them with the mouse and snapping them together. A block either fits into place or it does not, so you do not have to deal with typing mistakes.
You can build complex programs with blocks too. You can program driving, sensor reading and a series of Autonomous tasks, all inside Blocks. Using blocks does not mean your program has to stay simple.
For example, when you join the block that gives the value read from the gamepad stick with the block that gives power to the motor, the motor speeds up the more you push the stick. The first hands-on lessons in this guide also use Blocks.
OnBot Java
In OnBot Java you write text instead of blocks. The programming language you use is called Java. You reach the editor from the browser again, and again from the robot itself. What changes is not your computer but the way you write the commands. You can also build the same behavior with Java that you built with Blocks.
Not everyone who starts with Blocks has to move on to this. Switching to Java is not required; you can decide based on your team and the work you want to do.
Android Studio
Android Studio is a development environment you install on your computer. What makes it different from the other two is that you open the whole robot software project on your computer. You edit files, split the code into parts as the project grows, and use the development tools the environment offers. You load the program you prepare onto the robot from here.
Advanced work mostly happens in this environment. Splitting the project into parts, adding ready-made code from outside and looking inside the code with development tools are things you can do most fully here. Still, you do not need to finish the other two before moving to this environment. Opening the project, loading the first program onto the robot and adding a behavior with a sensor are jobs for the hands-on stage.
Configuration
Your program is going to turn a motor. But the robot has more than one motor. The program does not know on its own which one you mean.
The configuration does this matching. The configuration is a list that records which type of device is plugged into which port on the hub, and what name that device goes by in the program. If you plugged the motor that drives the front left wheel into a port and gave that port a name in the configuration, the command goes to that motor when you write that name in the program. If you match the name wrong, the program runs without errors but the wrong motor turns.
We will actually do this matching on the robot in the 1.5 Motor configuration lesson.
OpMode and running the program
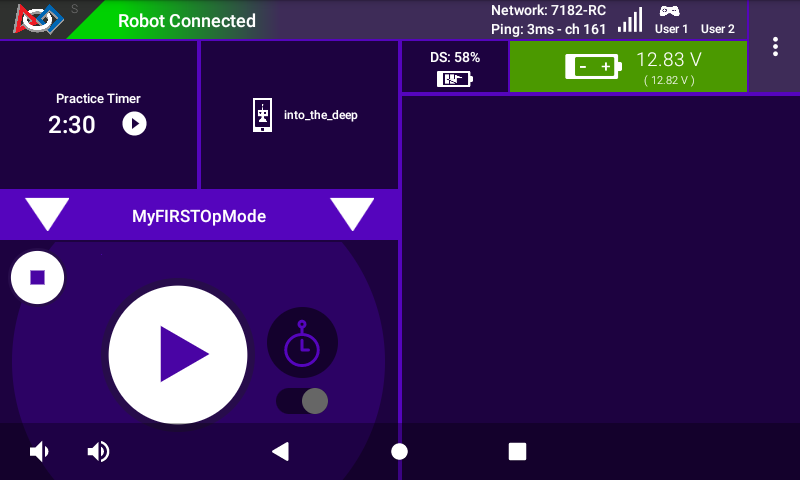
A team's robot does not have just one program. There might be one program for driving, another for Autonomous and a third for testing a single motor. Before you run the robot, you need to choose which of these you want.
You make the choice from the list on the driver device screen. Each robot program shown in the list is called an OpMode. You start the program from the same screen.
The program you start runs on the Control Hub on the robot. The computer is needed to prepare the code; it does not have to stay connected while you drive the robot. We will see how to run the first program in the 1.6 First motor program lesson.
There are two jobs that are easy to mix up. Updating the apps on the robot and on the driver device is not the same as changing your own program. An app update renews the robot's software foundation; it does not touch the program you wrote.
The program you write is saved on the robot. If the copy on the robot is the only copy you have, you cannot get your program back when the device breaks or the program is deleted by mistake. That is why keeping a backup of your code somewhere else is useful.
You do not need to wait for the robot to be completely finished to start on software. A chassis that drives and a single motor are enough for the first programs.
Telemetry
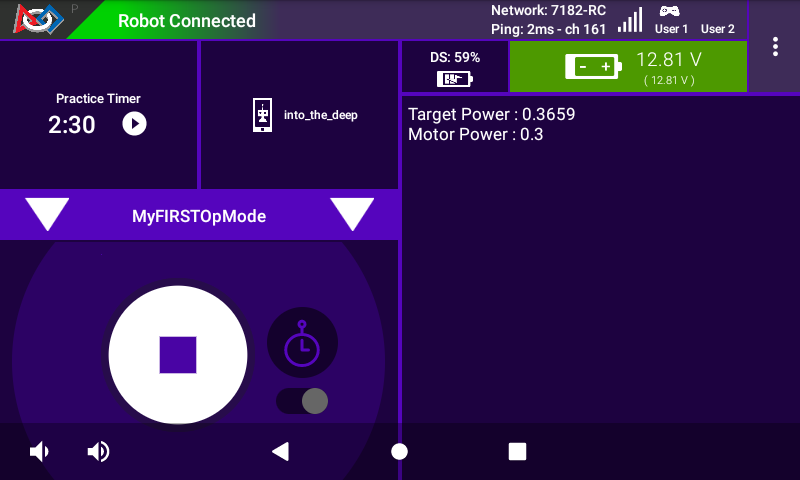
While the program runs, you cannot see what is going on inside it just by watching the robot move. The value coming from the gamepad stick, whether the limit switch is pressed, or the amount the encoder has counted does not show on the outside of the robot.
You can see these by having the program send information to the driver device screen. This information that the program puts out while it runs is called telemetry.
When you read telemetry, do not miss one difference. Seeing the power you gave the motor on the screen does not mean the motor is turning. What you see is the command the program sent. To know that the motor is really turning, you need to look at a value that comes back from the robot, such as an encoder reading. Telemetry narrows down where the problem is; it does not tell you the cause by itself.
The information a program can use is not limited to sensor readings. The image from a camera can also be processed and turned into information.
Camera and image processing
Webcam, VisionPortal and AprilTag
The camera gives the robot an image. The image itself is not yet information for the program. To understand where a game piece is in the image, or which marker is in front of the robot, the image has to be processed.
AprilTag is a black and white marker designed so that software can recognize it. When the camera sees one of these markers, the program can tell which marker it is and estimate how far away and at what angle it is relative to the camera. Working out the robot's place on the field from this is a separate job. Seeing a marker does not on its own tell you where the robot is.
VisionPortal is the tool FTC software provides for doing this kind of work with the camera image. It works with a compatible webcam. The tool itself comes inside the FTC software, but you need to get the camera separately.
HuskyLens and Limelight
You do not have to leave all the image processing to the robot program. There are devices that process the image themselves and send only the result to the robot. HuskyLens is one of them, used for tasks like color and object recognition. Limelight 3A is another, used for target tracking and AprilTag information. What the result is used for is still decided by the robot program.
Road Runner and Pedro Pathing
In the last lesson we saw that the Pinpoint produces an estimate of the robot's position. Knowing the position is not the same as following a set path. Planning the path from where the robot is to the target, working out how much power to give the motors while following that path, and correcting when the robot drifts off the path are all the software's job.
Not every team has to write these calculations from scratch. A collection of ready-made code that other people have written and shared, which you can use inside your own program, is called a library. Road Runner and Pedro Pathing are two libraries used for Autonomous path planning and following. Both are software, not a part you attach to the robot. Libraries like these are mostly used in projects opened with Android Studio.
Using a library does not give you a ready-made Autonomous. The team decides which path the robot will follow and which tasks it will do, adapts the software to its own robot and tests it. Setup and tuning are left for the hands-on stage.
Extras
- The FTC control system and OpMode explains the parts of the control system and where the program runs.
- Choosing a programming tool is the official page comparing Blocks, OnBot Java and Android Studio.
- Writing a program with Blocks is the official guide to the Blocks editor, including configuration and telemetry.
- Running the program gives the steps for choosing and starting an OpMode.
- VisionPortal and AprilTag covers processing the camera image in FTC software.
- HuskyLens is the official page on using the device with FTC.
- Limelight is the maker's FTC programming documentation.
- Road Runner is the library's source repository.
- Pedro Pathing is the library's documentation.
- Connecting to the robot, the network name and password are in the 1.4 Connecting to the robot lesson.
- Updating the apps on the robot and the driver device is in the 1.3 First power-up and device updates lesson.
- Setting up the motors in software is in the 1.5 Motor configuration lesson.
- The first motor program is in the 1.6 First motor program lesson.
- Motor control with a gamepad is in the 1.7 Motor control with a gamepad lesson.
- Backing up your code is in the 1.8 Code backup and running it again lesson.
- When to start on software and the order of the build are in the 0.11 From Kickoff to competition lesson.
- Resources and printables