What we'll do
- See what P, I and D each do, in one diagram.
- Tune the gains in the right order: P first, then D, and I only if you need it.
- Try it yourself with sliders.
- Look at short FTC Java examples for an arm and for driving straight.
Why it helps: a well-tuned PID gets your robot to the target without swinging past it or stalling a couple of centimeters short, and it lands in the same spot every autonomous run.
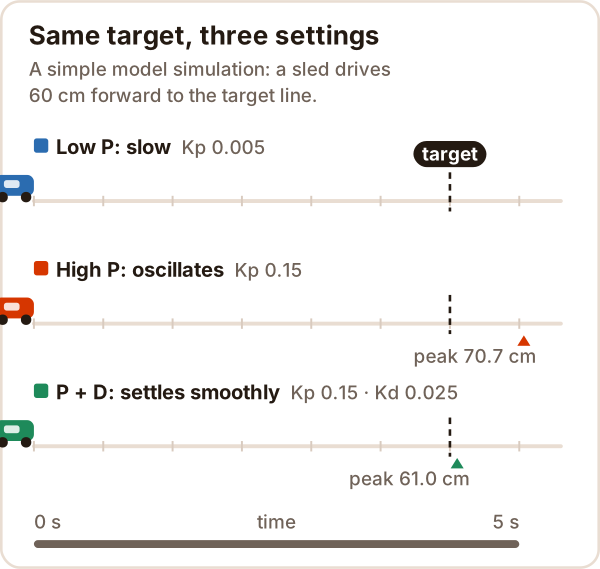
Every graph here is a simulation of the same simple model: a sled driving 60 cm forward. Your numbers will be different, but the behavior is the same.
PID at a glance
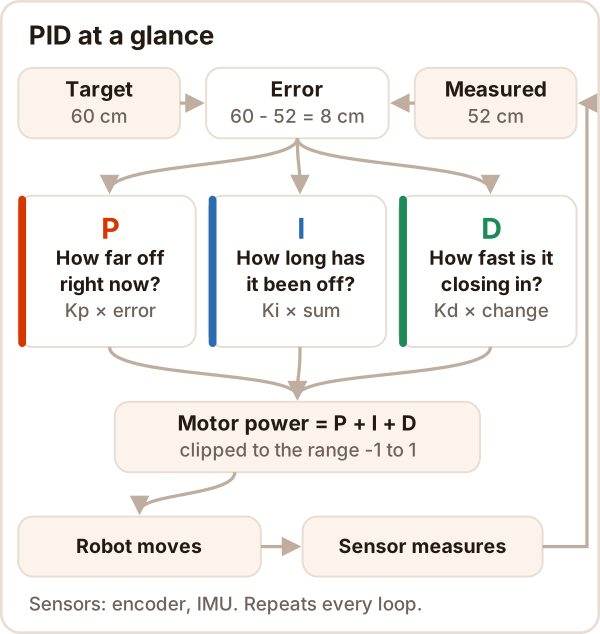
Every loop, PID looks at the gap between the target and the measured value (the error) and turns it into motor power. Finding good gains for it is what PID tuning means:
power = Kp × error + Ki × (sum of error) + Kd × (rate of change of error)
- P does most of the work: big error, lots of power; small error, a little.
- D is the brake: it cuts power while you close in fast, so you overshoot less.
- I builds up a small error that won't go away and slowly adds power.
You need a sensor: drive encoders for distance, an IMU for heading, a motor encoder or angle sensor on an arm.
Before you start
- See what you measure: put target, measured value, error and power on telemetry.
- Pick one unit and stick to it: ticks, centimeters or degrees. Kp changes a lot with the unit.
- Limit power: cap output at ±0.5 for the first tries, in an open space.
- Change one gain at a time: write down every try.
Tuning step by step
1. P only
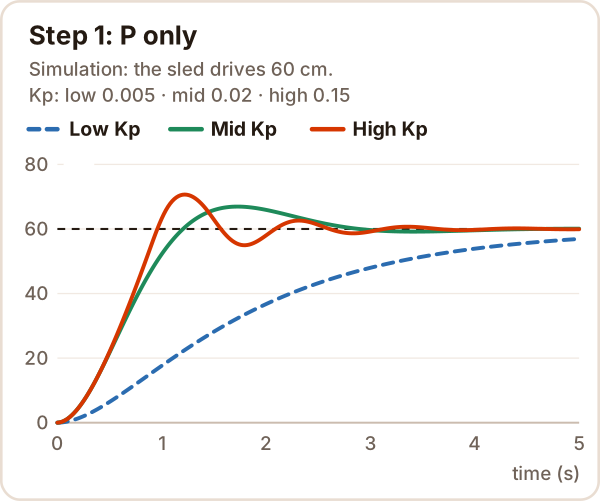
Set Ki and Kd to zero. Start Kp small (about 0.1 to 0.2 power at the largest error) and raise it step by step. You want a robot that gets there fast, overshoots a little once or twice and settles.
- Too slow: raise Kp.
- Swings back and forth around the target: Kp is too high, back it off a bit.
2. Add D to brake
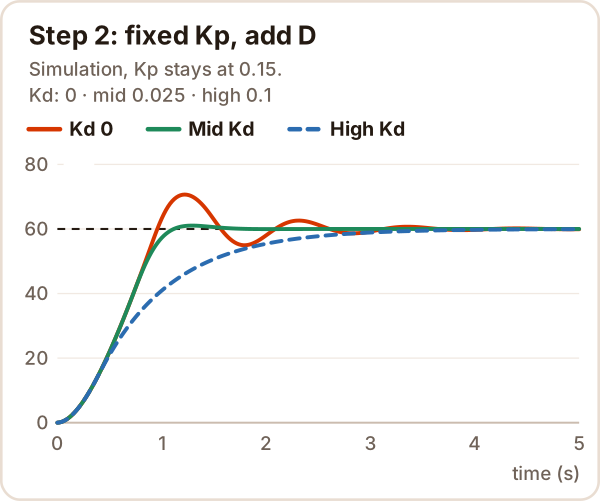
Keep Kp fixed and raise Kd in small steps; overshoot drops. You can then push Kp a little higher. Going back and forth between the two a few times is normal.
- Still overshoots: raise Kd.
- Jitters or buzzes at the target: Kd is too high or the sensor is noisy, lower it.
- Creeps in slowly (blue line): Kd is too high.
3. Last, and only if needed: a little I
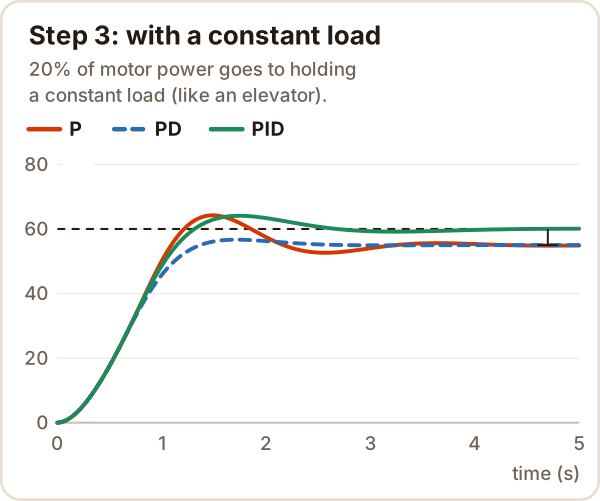
If the robot always stops the same small distance short (steady-state error), add a very small Ki and raise it slowly. I can add some overshoot.
Most mechanisms don't need I at all; the FTC community guide Game Manual 0 calls it the least important term for FTC. If the cause is gravity or friction, try feedforward first (see the arm example). If you do add I, limit the integral.
Try it yourself
This is a sandbox with Kp, Ki and Kd sliders; it needs JavaScript. If it didn't load, the three graphs above show the same experiments.
Suggested order: start with P only and tame the oscillation with Kd. Then tick Add a constant load, watch the sled stop short, and add a small Ki.
What you see and what to do
| What you see | Likely cause | What to do |
|---|---|---|
| Swings back and forth around the target | Kp high, Kd low | Lower Kp or raise Kd |
| Very slow | Kp low | Raise Kp |
| Raised Kp, speed didn't change | Motor already at full power | Check whether power is pinned at ±1 |
| Stops a little short of the target | Gravity, friction | Feedforward (kS, kG on an arm), then a small Ki |
| Jitters at the target | Kd high, noisy sensor | Lower Kd, add a tolerance band |
| Big overshoot on large target changes | Integral windup | Limit the integral, reset it when the target changes |
| Behaves differently late in the match | Battery voltage drops | Tune with a half-charged battery |
FTC: holding an arm at an angle
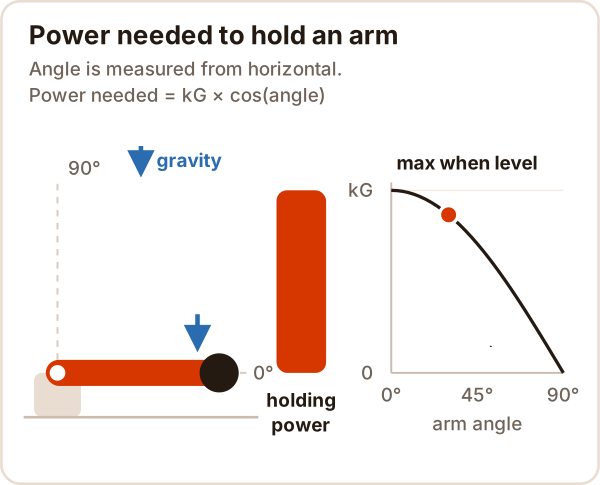
Gravity always pulls the arm down. With PID alone, the arm has to sag a little before there is any error to push back. That's why you tune gravity feedforward first and build PID on top of it.
- Kp, Ki, Kd = 0. Bring the arm level and let go; raise kG until the arm stays where it is.
- Then P, D, and I if needed. With good feedforward you usually won't need I.
// Every loop. DcMotorEx arm (RUN_WITHOUT_ENCODER), ElapsedTime timer.
// Gains start at 0; you tune them. At start: lastAngle = first reading, integral = 0.
double dt = timer.seconds(); timer.reset();
double angle = (arm.getCurrentPosition() - LEVEL_TICKS) / TICKS_PER_DEGREE;  // degrees from horizontal
double error = targetAngle - angle;

integral += error * dt;
if (kI > 0) integral = Range.clip(integral, -0.2 / kI, 0.2 / kI);  // integral limit
double derivative = dt > 0 ? -(angle - lastAngle) / dt : 0;  // from the measurement: no kick when the target changes
lastAngle = angle;

double feedforward = kG * Math.cos(Math.toRadians(angle));  // gravity feedforward
double power = feedforward + kP * error + kI * integral + kD * derivative;
arm.setPower(Range.clip(power, -1, 1));
Set integral = 0 when the target angle changes. The motor runs in RUN_WITHOUT_ENCODER so it doesn't fight the SDK's own velocity control; the encoder still reads.
FTC: driving straight and holding heading
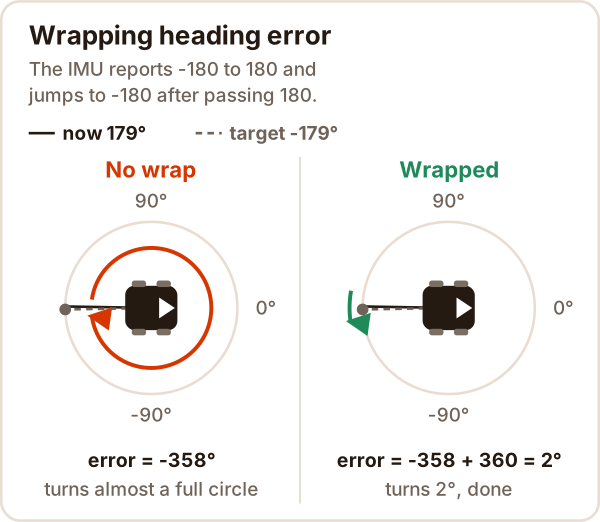
"Drive 60 cm forward" is two PIDs: a distance PID turns the average of the left and right encoders into forward power, and a heading PID (usually just P) turns the IMU angle into a turn correction.
ticks_per_cm = (ticks per revolution × gear ratio) / (π × wheel diameter in cm)
double headingError(double target, double measured) {
    double e = target - measured;
    while (e > 180) e -= 360;    // wrap to -180..180
    while (e <= -180) e += 360;
    return e;
}
// In the loop:
double heading = imu.getRobotYawPitchRollAngles().getYaw(AngleUnit.DEGREES);
double turn = kPheading * headingError(targetHeading, heading);
left.setPower(drivePower + turn);
right.setPower(drivePower - turn);
- If the robot makes the error bigger, flip the sign of
turn. - If it stops a few centimeters short, add a small constant power (kS) in the direction of the error: the power at which the robot barely starts moving.
- Tune with the real robot weight, on a surface close to the competition floor.
When is the SDK's built-in PID enough?
- The SDK has built-in velocity (
RUN_USING_ENCODER,setVelocity) and position (RUN_TO_POSITION) control. You change its gains withDcMotorEx.setPIDFCoefficients(RunMode, PIDFCoefficients). - Gains are per motor port and per run mode, and they don't survive a power cycle: set them at the start of every OpMode.
- It's fine for wheel velocity. For anything that needs feedforward, like an arm, write your own PID.
The 6 most common mistakes
- Copying another team's numbers: gains depend on units, gearing and weight.
- Changing all three gains at once: go P, then D, then I if needed.
- Fixing everything with I: use feedforward for gravity and friction; limit I.
- Ignoring
dt: loop time varies, so integral and derivative needdt. - Not wrapping heading error: the robot spins the long way around.
- Tuning Kp while the motor is maxed out: if output is at ±1, Kp changes nothing.
Sources
Accessed October 17, 2026
- Game Manual 0, Control Loops: tuning order, the role of I, cosine feedforward for arms.
- FTC Docs, Changing PIDF Coefficients: gains per port and mode, not kept after power off.
- WPILib, Tuning a Vertical Arm Position Controller: kG first, then PID.
- WPILib, Common Control Loop Tuning Issues: integral windup, voltage drop, saturation.